Incessant chatter with insufficient knowledge on quilting, knitting, sewing, cooking and the like.
Sunday, March 24, 2013
Project 2016 -- Florida or Bust:Kitchen Makeover -- Cabinets Finished
Yea! Yippee! The cabinets are done! I see a million mistakes but I am going to keep my mouth shut and let others decide if I did a good job or not. I am just relieved to have my kitchen back for a short time. The DH is ecstatic over the microwave's return to it's rightful place and getting the coffee maker out of the dining room. I am going to take a break over the next week through Good Friday and Easter weekend before tearing the kitchen apart in the next phase.
I can't wait to get the entire project done. Remaining on the to do list is repairing and painting walls and trim; and installing glass tile back splash.
And now I can knit more!
Happy Knitting!
Saturday, March 23, 2013
Under Pressure
Mm ba ba de
Um bum ba de
Um bu bu bum da de
Pressure
Pushing down on me . . .
OK, not quite that kind of pressure. Cooking under pressure! This is very new for me -- in fact, today is the first day that I have ever tried a pressure cooker. And here is why I did . . .
A few months ago, I was reading about re-purposing sweaters and yarn and I posted about another blog called Kayla K's Thrifty Ways and what she did with a sweater. I put her blog on my reading list and have been reading it off and on ever since. Recently married, Kayla received a pressure cooker as a wedding gift and fell in love with the cooker. She decided to use the cooker every day for the next 365 days. If this young woman can see the value in cooking great home-cooked meals in minutes, this old dog can add a new trick to her repertoire. Kayla convinced me!The whole point of a pressure cooker is that you can save energy and cook faster.
In my research, I found great website that explained how a pressure cooker works -- Hip Pressure Cooking. Pressure cookers have been around a long time. First developed in the 1600's, pressure cookers were not really used in home cooking. But in 1938, Alfred Vischler designed the first one for home use in the United States. National Presto Industries, known as the "National Pressure Cooker Company" at the time, introduced its own pressure cooker a year later at the 1939 World's Fair in New York.
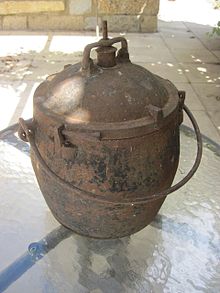
Pressure cooker made about 1864 |
Kayla mentioned that the cooker she had was a Presto 6 Quart Aluminum Pressure Cooker and that is the one I got for myself. Why try something untested when Kayla has paved the way. So for my first adventure in pressure cooking, I am trying one of the recipes in the instruction booklet that came with the cooker -- Beef Pot Roast.
_________________________________
Beef Pot Roast
3 pounds beef roast
1 tablespoon vegetable oil (I used olive oil)
2 cups of water
salt and pepper
1 small onion, chopped (I used a large one)
1 bay leaf
Pour oil into cooker. Turn heat selector to medium and brown roast well on all sides; remove roast. Pour water into cooker. Place roast on rack in cooker. Season roast with salt, pepper, onions, and bay leaf. Close cover securely. Place pressure regulator on vent pipe and cook 45 minutes with pressure regulator rocking slowly. Let pressure drop of its own accord. Thicken gravy, if desired.
_________________________________
I did make a couple of adjustments. The roast that I had was only 2.5 lbs so I reduced the cooking time by 5 minutes. I cooled the pot immediately by plunging it in a sink with 2 inches of cold water in it, opened the lid and added some fresh broccoli and cauliflower. Following the directions to cook them off of the fresh vegetable grid in the instruction booklet, I brought the cooker back to the point of the regulator rocking slowly and cooked for 1 minute and again cooled immediately.
The recipe was a hit! The roast was really tender. TheDH said the veggies were really great; I thought they were somewhat over-cooked but they had wonderful flavor. I can see where you could make a stew in just a few minutes. But next time, I will stop cooking the veggies as soon as the regulator starts to rock.
In looking at other recipes for pot roast, I saw one which took 3 hours in the oven and one which took 3 hours and fifteen minutes on the stove. I am sure that you could take either one of these and convert it to a pressure cooker recipe.
I have a corned beef in the fridge to try later in the week! Yum!
Happy cooking!
Saturday, March 16, 2013
Project 2016 -- Florida or Bust:Kitchen Makeover -- The Difference Glaze Makes
On the left is one of the cabinet doors with only the base paint; and on the right, one with the glaze layer added. On the left: cool, flat, grey; and on the right: warm, glossy, taupe. Wow, what a difference glaze makes!
As I wrote in one of my prior posts, I had to keep reminding myself the painting treatment was a two part process and continue through the cool, flat, grey color with which I was covering my cabinets. But now that I am on the second part of the color steps -- I see my plan coming together.
This step is going much quicker. I started yesterday after dinner at about 8:30 and at this point in time I have finished glazing all of the upper and lower cabinets and started the cabinet doors.
I am planning on beginning the final step of a clear protective coat tomorrow even though I will not have finished glazing the doors. The clear coat takes 12 hours to dry enough to put hardware on the doors, 24 hours for full use and 7 to 10 days to cure. I want to make sure that the cabinets are cured before re-installing the microwave since I removed it on Day One. The DH is missing the microwave -- no hot lunches when he is home alone.
I am beginning to see the light at the end of the tunnel. Although I won't be done by Easter Weekend, I can at least have a working kitchen -- I'll take a short break before I begin painting the walls and trim and install the tile back splash.
From TechHive: Pi Day Knitting
Every once in awhile I have to re-blog geeky, weird or fun knitting ideas that I find on the internet. This one is definitely in the geek category!
Please enjoy this post. . . and happy knitting!
Knitting a pi blanket is a great way celebrate Pi Day | TechHive:
'via Blog this'
Tuesday, March 12, 2013
Project 2016 -- Florida or Bust: Kitchen Makeover - Something is Finally Done!
The counter tops are done!!!
This was an interesting project--and a really hard project. As I have said in a prior post, the instruction video always looks easier than it is in reality. The changes we made before doing the color chips again helped in getting us a better result. And for the most part, the counter tops are gorgeous -- a couple of blips.
The finish is much different than I expected. When we applied the last coat, the product was very thick and gooey. As it hardened, it seemed to chemically bond to the color chip layer. The directions said to wait 48 hours before light use and a week before full use.
I can't wait for when the back splash and the cabinets are done.
Yipee!
Saturday, March 9, 2013
Project 2016 -- Florida or Bust: Kitchen Makeover Day Infinity
I love it when the DH vacuums |
LAST TIME: The video that was supplied emphasized working "quickly". Last time the thought that the adhesive base paint would dry before we got the color chips on, had me in a panic. We worked too quickly and as a result, did not get the product on thick enough and ran into each other and the counter top smudging it in a few places. We also tried to do each bank of cabinets successively, one right after another which just made the stress level increase as we went from the smallest to the longest counter top.
CHANGES WE MADE: After watching the video again, I saw that we had missed words on the screen that said we had about 20 minutes to apply the color chips. That was more time than I thought we had. This time we decided that we would do the largest counter top first. Then clean up and take a break for a couple of hours. Then go back and do both the two smaller counter tops. This helped us in two ways: We cleaned up the mess from the first application so we were not walking around in all the color chips. It will also allow us more time on the sanding tomorrow as that has a time sensitive window, too.
Happy Sanding!!!
Thursday, March 7, 2013
Knitting Merlot
I love the herringbone pattern on my Chelsea! Not only is it a lovely pattern, it is fun to knit even though it looks so "stiff upper lip" as the British say. I have knit about 7 inches and am ready to step down to the next needle size. The length of the skirt is to be 21" sans lace trim.
The yarn, Wool of the Andes Tweed, is really great. It holds up well to tinking and re-knitting, has great color and the texture is great! Can't wait to see what how it turns out. I think this is going to be one gorgeous skirt!
Happy knitting!
Wednesday, March 6, 2013
The 3 R's: Re-Purpose, Re-Use, Re-Cycle Redux
As I have told you before, I like to re-purpose things (or re-use). Here is something that can save you a few cents and brighten up a cross country gift.
When mailing a small gift to a friend, re-use a bright gift bag someone else used to give you a gift.
Cut off the handles and the tag.
You may need to remove a heavy piece of cardboard inside the lip of the bag
and you may need to trim the side of the bag that the bottom is on. This will give you a cleaner looking fold. After inserting the gift, fold the top of the bag to the side to which the bottom of the bag folds.
Using wide packing tape, close the bag shut and tape a mailing label on the side to which the bottom of the bag is folded.
Now that is a bright package! Wouldn't you love to open your mail box and find that bit of sunshine?
Happy standing in the line at the post office!!
When mailing a small gift to a friend, re-use a bright gift bag someone else used to give you a gift.
Cut off the handles and the tag.
and you may need to trim the side of the bag that the bottom is on. This will give you a cleaner looking fold. After inserting the gift, fold the top of the bag to the side to which the bottom of the bag folds.
Now that is a bright package! Wouldn't you love to open your mail box and find that bit of sunshine?
Happy standing in the line at the post office!!
Sunday, March 3, 2013
Skirt Weather Will Be Here Soon Enough
Although there is still snow on the ground in Chicago, I know that eventually spring weather will be here. With that in mind, I cast on one of the skirts that I bought yarn for waaaaaaay back in October. The Chelsea by Cecily Glowik MacDonald is a just what I need to start out skirt weather this year. The flirty hand-knit lace at the hemline is a wonderful juxtaposition to the all business herringbone tweed of the skirt itself.
My yarn for the skirt is Wool of the Andes Tweed in Claret. I have already knit through one skein. I have a couple of different choices of lace weight yarns for the trim. A pale pink Silky Alpaca Lace which I was using for a lace project since frogged or a pale lilac Shadow Tonal that I bought on sale from Knit Picks. But I think that I will wait until the last second to decide on the lace. Perhaps I will knit a few inches of both of them and decide which I like best.
The pattern, once I figured out what the author meant by RLI (Right Lifted Increase), was easy to learn. My confusion was easy to understand as there are two ways to describe the RLI: 1) Insert right needle tip from back to front into stitch below the next stitch on left needle; place this st on left needle and knit; and, 2) Knit into the back of the stitch (in the “purl bump”) in the row directly below the stitch on the needle, then knit the stitch on the needle, and slip the original stitch off the needle. In the 1st instance, the lifted increase ends with one stitch on the right needle, in the 2nd the lifted increase ends with two stitches on the right needle. So for the herringbone pattern directions of:
ROWS 1 and 3: (WS) Purl.
ROW 2: *K2tog, k2, RLI (see Glossary), k2; rep from * to last st, k1.
ROW 4: K1, *k2, RLI, k2, k2tog; rep from * to end.
Rep Rows 1–4 for pattern
If you use the 1st "definition" of RLI on ROW 2 you get
K2tog = 1 stitch on needle
k2 = 2 stitches on needle
RLI = 1 stitch on needle
k2 = 2 stitches on needle
a total of 6 stitches.
But, if you use the 2nd "definition" of RLI on Row 2 you get
K2tog = 1 stitch on needle
k2 = 2 stitches on needle
RLI = 2 stitches on needle
k2 = 2 stitches on needle
RLI = 2 stitches on needle
k2 = 2 stitches on needle
a total of 7 stitches. Since the author gave the pattern repeat as 7 stitches and I was using the 1st definition, it took looking at the notes by other knitters in Ravelry and asking questions in Knitting Paradise's forum before I figured it out. Good thing the knitting world is large and gracious in sharing knowledge.
Gotta go, I have a lot of knitting to do! Happy Knitting!
Project 2016 -- Florida or Bust: Kitchen Makeover Days Eight and Nine
This is my living room. It consists of all the painted doors of my kitchen cabinets and all of the contents of my kitchen cabinets. Unfortunately, this is how it will remain for the next few weeks as I slowly progress through the two remaining steps to my cabinet makeover (let's just ignore the whole counter top debacle).
If I had it to begin all over again, these are the things I would do differently:
My working vacation is over and I must return to work tomorrow morning. I will have to insert the next steps of the process during the evenings and upcoming weekends.
Happy painting.
If I had it to begin all over again, these are the things I would do differently:
- Only plan one project at a time. I shouldn't have thought I could get so much done in one week. But that would have depended on:
- Doing more research. If I had gone through the videos a couple of times, I might have realized that the project had a lot of steps and would take more time. Breaking the steps into smaller projects would have allowed me to rest between projects. It may have also allowed me to realize that I needed more room to progress quickly on painting the cabinet doors. Perhaps set up the painting in the basement -- regardless of how cold it might be down there.
- Do more prep work in advance. I wasted an entire day just cleaning out my kitchen cabinets. I could have done this in the evenings prior to my working vacation.
My working vacation is over and I must return to work tomorrow morning. I will have to insert the next steps of the process during the evenings and upcoming weekends.
Happy painting.
Friday, March 1, 2013
Nuts to You -- A Squirrelly Lesson in Design
Things that turned out well:
I am really happy with the colors. The graduation in the three light colors from pale yellow to a golden tan works nicely in the corrugated ribbed band.
I love the way the circle of acorns turned out at the top of the hat.
The triangular motif that I pulled out of Alice Starmore's book sets off both the ribbing and circle of acorns. I am so glad that I did them as mirror images to each other.
Things that I could have done better:
Although I do like the squirrels -- the design is way too big for the hat. I am not sure I could make this any smaller for this style. Believe me I cut a lot out of the design. This is something that should go on a sweater.
The ribbing would have been better if it was narrower and done with a smaller needle. In fact the entire hat could have been done with a smaller needle.
Back to the drawing board.
Happy designing.
Project 2016 -- Florida or Bust: Kitchen Makeover Day Seven
It's a good thing that my motivation isn't at a high level today. As I stated in yesterday's update, painting the doors is really slow. I did take another shelf and put screws in it too so that I can have two doors drying on it while I have two to paint on the other rack.
Guess I will get some knitting done today! YES!
Happy KNITTING (between painting doors)!
Subscribe to:
Posts (Atom)