Showing posts with label saving money. Show all posts

Monday, April 1, 2013

Making Yogurt


Last Sunday -- Palm Sunday -- my church challenged everyone to do a screen fast. What is a screen fast? A screen fast is a decision to deny yourself something that you spend a lot of time at -- to give up movies, TV, video games, and social media to focus on Christ during Holy Week. I decided to give up screens for a week. But I had to fill up some of that empty time with something, so I decided to try something that I have wanted to do for a long time -- make homemade yogurt.

I love yogurt. I eat a lot of yogurt and buying the little cups of single serve yogurt gets expensive. Even the large containers of yogurt is expensive at $5 or $6 per quart and milk is only about $3.00 per gallon. I knew that if I could make yogurt, I could save money.

I had already talked to an acquaintance at a party just before Christmas who makes his own yogurt -- he made it sound so easy. I had done some research on the internet about making yogurt and there it sounded easy -- it was just a matter of finding the time. And now, with my screen fast, I had time.

This is the method/recipe I decided to use:

Ingredients

1/2 gallon whole milk
1/4 c Greek yogurt with active culture (I used FAGE on my first batch)
Tools

Food Thermometer
Microwave Oven
Picnic cooler
Container (I used a 2 quart Pyrex dish)

1) Heat the milk in the microwave using a heat resistant container to a temperature of 185° to 195° stirring occasionally. In my Pyrex dish, it took about 15 - 18 minutes.

2) While the milk is heating, pour warm water of 120°  in a picnic cooler. This will be where the yogurt sits while the culture multiplies.

3) As soon as this temperature is reached place the bowl in a sink full of cold water and stir until the temperature reaches about 120°.

4) Remove about 1 cup of milk and mix into the 1/4 cup of yogurt. When this is completely mixed, pour it back into the warm milk and cover with lid or plastic wrap. Transfer the container to the cooler and let sit UNDISTURBED for at least 6 hours. Remove from the cooler and refrigerate.

My first batch was not really great. In my research, I read that the time to leave yogurt to culture was anywhere from 3 to 12 hours. I left my first batch for 3.5 hours. It tasted like mild yogurt but was not very sour. (I like mine pretty sour -- more like Greek yogurt.) The first batch also did not set up enough, in fact it was somewhat slimy and thin. Not such a great consistency. But not being one to waste food, I just mixed it with some cooked apples and it was delicious. I also used some to make a yogurt dill dressing for Tilapia that I made in my pressure cooker.

My second batch was much better. I used 1/4 cup of the first batch as the culture for this batch. I left the yogurt in the warm water filled cooler for 6 hours. This yogurt set up nicely and was a much more pleasant consistency. It was somewhat more sour although still rather mild tasting.

The last batch that I made sat in the cooler for 8 hours. This yogurt was perfect! Very thick and just right in sourness. So, at least for me, I found the perfect length of time. So easy to add a little culture to my life!

I served my yogurt up with some cooked Fuji Apples. No sugar, just the apples with 1 cup of water in my slow cooker. Yum.

Happy fermenting!

Saturday, March 23, 2013

Under Pressure


Mm ba ba de
Um bum ba de
Um bu bu bum da de
Pressure
Pushing down on me . . .

OK, not quite that kind of pressure. Cooking under pressure! This is very new for me -- in fact, today is the first day that I have ever tried a pressure cooker. And here is why I did . . .

A few months ago, I was reading about re-purposing sweaters and yarn and I posted about another blog called Kayla K's Thrifty Ways and what she did with a sweater. I put her blog on my reading list and have been reading it off and on ever since. Recently married, Kayla received a pressure cooker as a wedding gift and fell in love with the cooker. She decided to use the cooker every day for the next 365 days. If this young woman can see the value in cooking great home-cooked meals in minutes, this old dog can add a new trick to her repertoire. Kayla convinced me!The whole point of a pressure cooker is that you can save energy and cook faster. 

In my research, I found great website that explained how a pressure cooker works -- Hip Pressure Cooking. Pressure cookers have been around a long time. First developed in the 1600's, pressure cookers were not really used in home cooking. But in 1938, Alfred Vischler designed the first one for home use in the United States. National Presto Industries, known as the "National Pressure Cooker Company" at the time, introduced its own pressure cooker a year later at the 1939 World's Fair in New York. 

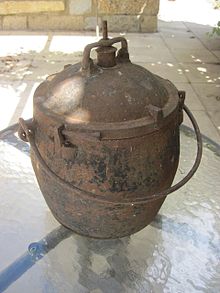
Pressure cooker made about 1864
Kayla mentioned that the cooker she had was a Presto 6 Quart Aluminum Pressure Cooker and that is the one I got for myself. Why try something untested when Kayla has paved the way. So for my first adventure in pressure cooking, I am trying one of the recipes in the instruction booklet that came with the cooker -- Beef Pot Roast.


_________________________________

Beef Pot Roast 

3 pounds beef roast
1 tablespoon vegetable oil (I used olive oil)
2 cups of water
salt and pepper
1 small onion, chopped (I used a large one)
1 bay leaf

Pour oil into cooker. Turn heat selector to medium and brown roast well on all sides; remove roast. Pour water into cooker. Place roast on rack in cooker. Season roast with salt, pepper, onions, and bay leaf. Close cover securely. Place pressure regulator on vent pipe and cook 45 minutes with pressure regulator rocking slowly. Let pressure  drop of its own accord. Thicken gravy, if desired.

_________________________________

I did make a couple of adjustments. The roast that I had was only 2.5 lbs so I reduced the cooking time by 5 minutes. I cooled the pot immediately by plunging it in a sink with 2 inches of cold water in it, opened the lid and added some fresh broccoli and cauliflower. Following the directions to cook them off of the fresh vegetable grid in the instruction booklet, I brought the cooker back to the point of the regulator rocking slowly and cooked for 1 minute and again cooled immediately.

The recipe was a hit! The roast was really tender. TheDH said the veggies were really great; I thought they were somewhat over-cooked but they had wonderful flavor. I can see where you could make a stew in just a few minutes. But next time, I will stop cooking the veggies as soon as the regulator starts to rock.

In looking at other recipes for pot roast, I saw one which took 3 hours in the oven and one which took 3 hours and fifteen minutes on the stove. I am sure that you could take either one of these and convert it to a pressure cooker recipe.

I have a corned beef in the fridge to try later in the week! Yum!

Happy cooking!

Wednesday, March 6, 2013

The 3 R's: Re-Purpose, Re-Use, Re-Cycle Redux

As I have told you before, I like to re-purpose things (or re-use). Here is something that can save you a few cents and brighten up a cross country gift.

When mailing a small gift to a friend, re-use a bright gift bag someone else used to give you a gift.

 Cut off the handles and the tag.

 You may need to remove a heavy piece of cardboard inside the lip of the bag

and you may need to trim the side of the bag that the bottom is on. This will give you a cleaner looking fold. After inserting the gift, fold the top of the bag to the side to which the bottom of the bag folds.
Using wide packing tape, close the bag shut and tape a mailing label on the side to which the bottom of the bag is folded.

Now that is a bright package! Wouldn't you love to open your mail box and find that bit of sunshine?


Happy standing in the line at the post office!!