Sunday, December 1, 2013

The Wedding Dress -- The Fitting and Necessary Adjustments


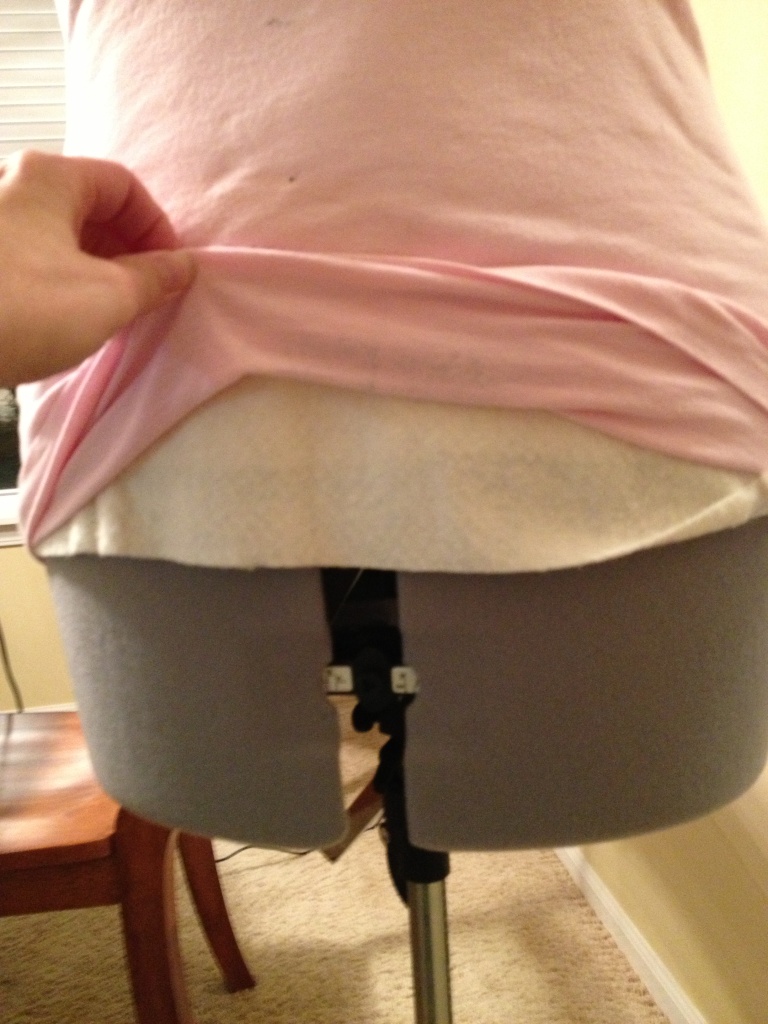
The DD came up for Thanksgiving week and the second she arrived home from the airport, she wanted to try on the dress. Ouch -- the muslin was too big. It was probably a combination of her loosing a couple of inches and my cutting/sewing, but it was large all over. Because I had previously made so many adjustments.to the base bodice, I ended up making an entirely new one. I began by pinching up a small portion of the deference at each seam in order to spread out the adjustments evenly over all of the seams. Next I marked the changes onto new fabric and then re-cut all new pieces.

DD also wanted a few changes. The ruching in the drapes was too soft and not tight enough for her. So not only did I have to narrow the front and back drapes, I had to lengthen them to allow for more gathering from top to bottom.

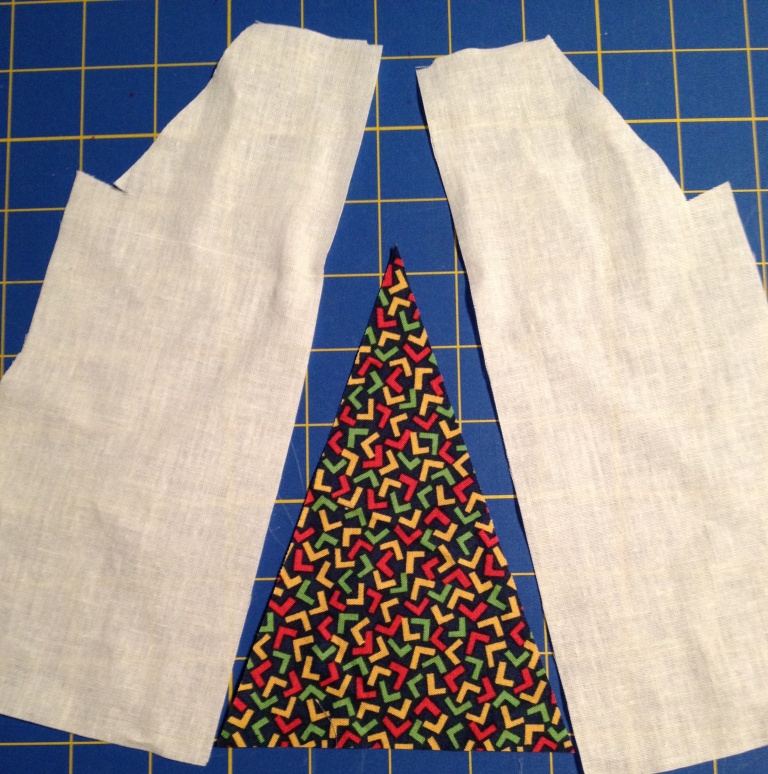
It took me a while to figure out how to accomplish lengthening the pieces; but I ended up cutting the drape into 3 even slices and then pinning them on new fabric measuring from the salvages over to the grain line in each slice of the pattern piece. I smoothed out the seam lines with my fashion ruler and marked the new pieces.


On the left is the resulting elongated back drape and at the top of the page you can see the new and tighter looking ruching.

So, along with hosting Thanksgiving and having two of the "kids" home for the week, I have had to begin re-cutting the the muslin. We did have a fun morning a Vogue Fabric in Evanston, Illinois -- What a treat that was! Stay tuned for that story.

I have to admit, I have not been sleeping well the last few days. I lie awake trying to figure out what I need to do next; thinking about what else could go wrong; and wondering if I bit off more than I can chew.

Time will tell. Happy insomnia!


Saturday, November 2, 2013

The Wedding Dress -- The Flirt Skirt -- Changing the Pattern from Five Panels to Six


Back Panel of Simplicity 1760
Drew strait line past kick pleat
A few days ago, I posted that I had selected a pattern for DD's flirt skirt for the post wedding party. I explained that one of the things that I planned on doing was changing the back of the skirt from two panels to 3 panels making a total of 6 panels. This means that I will have 6 seams fairly evenly spread out around the hem of the skirt so that the box pleats (yes DD selected the box pleats) are also evenly disbursed.

Simplicity 1760 has a kick pleat and zipper along the center line. The zipper will be moved to the left side to match the zipper position of the bodice. By removing the kick pleat, I then had a straight line for the fold.

Marking the dart for cutting
There is also a dart in the center of each panel. I decided that the easiest way to divide the back, was to split it right though the dart. On the pattern piece, I drew a line parallel with the grain line from the point of the dart to the hemline. I then took my fashion ruler and drew in a curve from that point through the two top points of the dart. These lines are now my seam line.

I then pinned the piece to muslin and marked the back side panels with my tracing wheel and wax paper. When that piece was completely marked, I removed the pattern and marked another piece of muslin folded on the grain. This gives me three panels -- two sides and a center which was cut on the fold.

In the picture below you can see where the seam lines are marked. The 'X's are the center point of the former dart. I'll put the muslin together without the box pleat for the fitting. I don't want to do all the work for six box pleats just to find out that the skirt is 6 inches too long.

The marked former dart
I can finally see the light at the end of the tunnel as far as the muslin is concerned. My DD arrives for the Thanksgiving holiday and her fitting. We are also setting aside a day for a special trip to Vogue Fabrics to purchase the silk for her dress.

I have one last experiment left to see how big my circle ruffles need to be in order to get the perfect ruffle. One of my sewing friends suggested making the ruffles wider as they go down the skirt. Guess I will add that thought to the experiments.

Happy sewing!

Thursday, October 31, 2013

The Wedding Dress -- Godet vs Box Pleat

Faux box pleat (rt) and godet (rt)
Godet vs Box Pleat or should I say faux box pleat. We're talking flirt skirt here. I decided to experiment with a couple of options that may work for the reception flirt skirt. This skirt is in addition to the long wedding dress skirt with a train that I finished in my last post. What DD and I envision is a matching pencil flirt skirt which DD can change into during the reception so that dancing is easier. She can also take the separate bodice with the pencil skirt with her on the honeymoon to wear when night clubbing.

There are several ways to make the pencil skirt (Simplicity 1760) a flirt skirt. Any method that widens the skirt at the knees will make it a flirt skirt. I decided to experiment with the "godet" and a "faux box pleat". placed strategically around the hemline of a skirt, either option will allow movement of the skirt at the knees.

godet pieces
godet finished
A godet is a pie shaped slice of fabric. Here I used a triangular slice, but sometimes a godet has a rounded tip. I sewed the colored triangle to one "panel". Then sewed that entire "panel" to the other panel.

faux box pleat parts
Depending upon the type of fabric and the "hand" or feeling that it has, this slice of fabric may or may not be very visible.
 Of course with the fabrics being white and ivory, there will be little difference.

The faux box pleat is made using a colored rectangular or square piece of fabric between two panels of the skirt. The fabric is folded and as a result hides unless the wearer of the skirt is moving. Using a color of fabric similar to the main color of the skirt will make a very subtle look. While somewhat more complicated, imho, the box pleat gives 10 times the wow factor.

faux box pleat finished
Although it is totally up to DD (eh hem) I already know what option I that prefer. But of course DD will have final decision -- with a little help from her loving designer -- um er -- mom!

Happy flirting!

Sunday, October 27, 2013

The Wedding Dress -- Love Train


I got the muslin skirt for DD's wedding dress finished last night. Except for the fact that if felt like I cut miles of fabric, marked miles of seam lines, and sewed miles of panels together -- the skirt went together so easy! The skirt has 12 panel with lots of flair even after I adjusted it to reduce the parachute affect that the pattern has. After the bodice, it was a joy to assemble.

Going forward, I have been restricted to what I am allowed to show in the photos of the wedding dress. I am "Facebook friends" with the FSIL and DD does not want him to see photos of the whole dress. Since my blog automatically posts to my Facebook timeline I have to get all posts approved! But that is OK with me. At the end of July, I will likely make you tired of looking at pictures of her in the dress!

I finally purchased a skirt pattern for the pencil skirt. Simplicity 1760 view "D" is the choice. View D is the one the model is wearing. I am going to add flirt panels at the knee and extend the ruching a little lower than the pattern indicates. The ruching will mirror the bodice nicely and give interest to an otherwise plain skirt.

If you remember, the dress will be a mixture of white and ivory. The pencil skirt will be white with the flirt panels in ivory. The front of the dress has a modified princess seaming with three panels but the back is two paneled. I will likely change it to a 3 panel back so that there are a total of 6 panels and therefore 6 flirt panels. Changing the back to three panels won't be a problem as I intend to move the zipper to the left side to match the bodice anyway. It also eliminates the kick pleat at the back of the skirt. For some reasons I hate sewing kick pleats.

Well, DD arrives for Thanksgiving and her first fitting 4 weeks from today. I feel pretty good right now and with only the flirt skirt left, I'm ready for what ever the fitting brings.

Happy sewing!

Sunday, October 20, 2013

The Wedding Dress -- Bodice Finished - Lessons Learned


The muslin for the bodice is finally finished and I think this final version looks good. I learned a lot working on it and already have a list of things that I need to remember when making the real thing.

For the actual dress, I will get the finest and smoothest thread possible. Yes, I used colored thread on the muslin's seams, but even were I used light colored thread, you can still see the stitches. On fine silk, that will really show.

I need to take the time to measure the stop and start points of the draping on the side. As you can see on the photo to the left, the draping does not match on the side. It is off about 3/4 of an inch. Although some people may not have even noticed it -- having that in the finished product will drive me insane. (When DD's father walks her down the isle, there might as well be a neon sign with an arrow pointing to her side.)

You can really see that all of the untrimmed seams are poofing out the seam a bit. I also did not iron or steam the seams. There is no sense in doing that if I will be undoing them. Rest assured, the final version will be much smoother.

The unfinished side is where the zipper ends up. I am not going to add the zipper to the muslin - if I have to take it in or let it out at all during the fitting (and that is likely) I don't want to have to remove a zipper. I will have to pin it on DD along the seam line and fit it that way.

I like the back although it could have a little bit more ruching on the top side. In order to add more ruching, I will need to make the draping a couple inches taller form top to bottom. But I don't think that would be a problem. I will let DD make the call -- she is the one whose going to wear it after all.

By the way, I have cut out and sewn in all the seam lines on the skirt and will start constructing it this week.

Happy sewing!

Monday, October 7, 2013

The Wedding Dress -- On to the Skirt

McCall's 6701 is the base for the Hi-Low skirt that DD wants for her wedding dress, however, some adjustments need to be made. First, each panel is one piece from the top of the bodice to the bottom of the dress. I selected a line just above the pattern's waist which is one of the two points made for lengthening and shortening the dress. At this point I cut the bodice off of each piece. First adjustment accomplished.

Secondly, I needed to reduce the flair of the skirt to make it look more bridal and less parachute. I decided to make the adjustment using a hinge at the second lengthening/shorten point. Since I am not sure I can explain it with just words, I took pictures of the process with one of the smaller panels.

On the left you will see one of the panels of the skirt. I have circled the second lengthen/shorten mark.


Using a straight edge and my rotary cutter, I cut along this line.


I then folded the pattern, matching the line for the hem of a short version of the dress. After creasing the fold, I cut along that fold. I did not use the grain line as the cut. I wanted that left intact.


Here you can see all the pieces spread out.


Lifting one piece, I swung it over the other, overlapping the two pieces under the horizontal cut with a "hinge" at the top. When I go the pieces positioned just right, I taped up the overlap and taped the top piece back on making sure to line up the grain line. Then I redrew my hemline.

If my calculations are correct I removed about 2 feet out of the circumference of the dress at about the ankle. I think that this will reduce the flair enough, but if necessary, I can always make a similar hinge cut on the other side of the grain line.

Happy hinging!


Sunday, September 29, 2013

The Wedding Dress -- It's a Dress Rehearsal, Not Just Practice


This weekend was productive and unproductive -- all at the same time. I got the entire bodice put together and then took the whole thing apart again. There were two problems. First, the bodice did not fit Monica and since Monica is set to the approximate size of DD, the bodice would not fit DD. The bodice was approximately 1 to 2 inches too big all the way around at every measurement. I can only guess that since the bodice is cut on the bias and I washed the fabric first; that as I handled it, the muslin stretched back out a little. It is cotton and cotton will stretch a little -- kind of like how blue jeans always fit looser a couple of hours after you put them on. Secondly, I disliked how the gathers at the sides looked -- uneven and sloppy. So that meant that I had to adjust all of the pattern pieces for size and re-do the gathering.

I took most of the pieces apart, removed all of the old gathering stitches from the front and back drape pieces, and ironed everything carefully. Then using the marks that I made while Monica was wearing the bodice, I redrew some of the seam lines on both the base and the drape pieces using my new fashion ruler.


After redrawing the seam lines, I restitched all of the gathering lines in triplicate. (Note the stitching line on the left is the seam line.) This time, I used a method that I found on Sew Much Good. This method does not lengthen the stitch at all, but loosens the upper tension allowing the bottom thread to be pulled -- gathering the fabric. This method seemed to work much better for me. I got a much more even gather than I did before.


I then hand basted the gathered drape onto the base fabric following the sewn seam line. I like the result of this much better (see picture at the top of the page). I keep forgetting that the muslin is not just a practice dress, but a dress rehearsal dress. Ask anyone who has performed -- there is a difference. Therefore, I need to be as meticulous with this one as I will be with the real one.

For now, I have a lot of basting left to do. As soon as I have pictures of a completed bodice, you'll be the first to see!

Happy Basting!

Thursday, September 19, 2013

The Wedding Dress -- Bodice Front

draping gathering muslin
This is version #3. I know it probably does not look very different from the pictures of version #1 at first glance, but I think that the ruching looks much more even across the bust. I cannot show you version 2 as I only got one panel on and realized that it needed further adjustments, took the gathering out of one side, adjusted the seam line and put in new gathers in both panels.

Now, I will sew the ruched panels to the underlayment and see how it looks. I want to get the bodice front a little bit tighter, but that is hard to do with out having a back attached. I will try the two back panels next week. I am out of town this weekend and won't get to work on the dress at all. But I am happy with the progress thus far. The bodice is the part that scares me the most. I still have 9 weeks until the DD is home to try on the muslin.

Happy Sewing!

Monday, September 16, 2013

Correction (I'm Sari, I Made A Mistake)


After my last post, a friend of mine commented to me on facebook: "There is a difference between gathering and draping." Um, yeah, okay, but you see/hear the term used inappropriately in fashion all the time! But, that does not mean I have to follow the crowd.

Draping is creating a dress or garment simply by arranging fabric around a body using the natural fall of the fabric. The most famous drape would be the sari." And that of course is nothing like what I was doing with the wedding dress (even if the pattern pieces are named "front drape" and "back drape").

I also referred to gathering which is a term which refers to a length of fabric being drawn up into gathers and sewn into a shorter length of fabric. I am not gathering in this dress either. (Here is a fantastic tutorial by Dana at Made).

What I am actually doing on DD's wedding dress is "ruching." Ruching
is a gathered overlay. Parallel sides of the fabric are gathered and stitched to an underlayment. Often the ruching is done with a sheer such as chiffon or organza. Now that sounds like what I am doing! Ruching is commonly seen in evening wear and bathing suits. But in my research I also found examples of ruched jacket, gloves, leggings, shoes, and t-shirts.

So, now that I finally know what I am doing. I can speak with authority -- even if I haven't figured out what I am doing!

Happy Ruching!


Sunday, September 15, 2013

The Wedding Dress -- We Are Gathering Here, Today

drape gathers ruching

The muslin progresses. I took the pattern pieces for the drape out of Vogue 8150 and prepared the muslin pieces in the same manner as I described here. I also made another set of bodice muslin pieces of Butterick 5419 to act as the underlayment (if I may use a construction term) for the draping. I gathered the edges of the pattern per the directions and did my best to apply them to the bodice. Above you will see the results of the "marrying" of the two patterns. (Pun intended)!

I have to make some adjustments to the draping as the sweetheart neckline of the Vogue is a somewhat different shape than the Butterick 5419. Later in the week, I will take the draping down and make some adjustments to the pieces and use them like pattern pieces to make new draping pieces. The I can re-gather the fabric to see if I can get it to match up better with the bodice.

Happy gathering!

Monday, September 9, 2013

The Wedding Dress - Progress on Muslin


Over the last couple of days, there has been some progress on the wedding dress. I spent some time cutting apart the necessary pattern pieces for the draping (Vogue 8150) and the skirt (McCall 6701). I then ironed each piece with a cool iron, marked the stitching line and lengthened the grain line. The tough part is trying to figure out where to finish the top of the skirt since the dress is made with full length panels from bust to floor (see photo above). Considering that I am taking parts of this dress from Butterick, McCall and Vogue, I should be calling this the Wedding Dress of Frankenstein.

I have been keeping track of the number of yards of muslin that I have used. This will give me a good idea of how many yards of fashion fabric that I will need to buy. I cannot rely on the package estimates because I am only using parts of each pattern. There will be a lot of yards of fabric.

Today, Monica arrived. Who's Monica you ask? Why it is Monica Mannequin our new family member. Do you think that it is weird to name your dress form? Yeah , I know --weird.

But she was quick to set up and not too hard to get into the correct measurements. However, every body is different and I had to pad out some areas to get them to the right shape, so I took some quilt batting and padded out Monica's figure to match DD's.

In order to keep the batting on, I took an old T-shirt, cut off the sleeves. Then I used my new serger to serge up the sleeve holes and take in the waist. Now it fits Monica like a glove and keeps the padding where it is needed.


Here you can see that Monica now has a nice round feminine shape instead a flat-as-a-board stomach. I may have to adjust this a little when the real DD comes up for her fitting in November, but this will give me approximates. Now that Monica has arrived, it will be easier to see how the pieces that I construct will look on a human. It is hard to see how it looks on me and my husband refuses no matter how much he loves me. Monica and I have some work to do -- we will blog our progress later!

Happy sewing!


And THIS is the Reason I Make Baby Quilts!


Momma says little Sofia loves her quilt and is enjoying playing with it! She just laughs at it! And that, Ladies and Gentlemen, is all the thanks I need! Some people say a picture is worth a thousand words -- it is also worth all the pin pricks, all the hand sewing, all the calculating and figuring -- all the work!


"Mom! Look! It's so pink!"


And one more shot, because two are just not enough!

And I am HAPPY!

Sunday, September 8, 2013

Baby Quilt Saga Continues


I could have had this quilt done earlier in the week, but I was busy with the boning for the wedding dress. This was what I was trying to finish yesterday when I had disaster #1. Despite all of the activity surrounding it, this quilt was easy to construct and went pretty quickly. I had actually created the four blocks at the same time as I did another set back in November when my DD; the knitting sister and had a Thanksgiving quilt-a-thon. The other quilt was just like this but with a blue cap and red shoes.

The inner border is a 2 X 2 block similar to what I did with the skull quilt and the outer border is a modified log cabin round. This border is nice because each side is the same length and width and you don't need corner blocks. The trick is to measure the length of the center quilt -- in this case 24 1/2 inches; adding the width of your planned strip -- for this quilt 7 inches; and less the two 1/4 inch seam widths. So the size of the strip was 31 inches X 7 inches.

The second trick to constructing the quilt is that the first side must be sewn part way in a method known as "partial seam construction." Kind of obvious, right? Since I am too busy to do a tutorial myself, I found one that I think is really well done on Fresh Lemons to share with you. She has done an excellent job of explaining the technique -- I think you will find it very easy to follow.

Next in line will be another girl quilt which is also using up blocks from the Thanksgiving quilt-a-thon.

Happy quilting!

Saturday, September 7, 2013

The Wedding Dress - Disaster #1


I am naming this Disaster #1 because I expect with as difficult of a project as a wedding dress is combined with my lack of attention and my bull-in-a-china-shop sewing philosophy this will not be the last disaster! I decided that the 4 longer strips of boning needed to be heated again and straightened a little better. After putting them in a pot of boiling water, I went to work on my current quilt project. An hour later I smelled burning plastic.

The pot is ruined. I have to buy more boning. Would you call this a sewing disaster, cooking disaster or both?

This was not Happy Anything!


Friday, September 6, 2013

The Wedding Dress - 1st Attempt at Placing Boning

So this was a new thing for me. If you have ever worn a strapless dress, more than likely you are familiar with boning. It is called "boning" because of one of the original materials: whale bone. Boning today is usually made with plastic or metal and can be bought with or without pre-made channels. For purposes of making the muslin for DD wedding dress, I bought some inexpensive boning with channels at my local big box craft center.

Since I had never used boning in any sewing project, I had to do some research on the internet. I found two terrific blogs on how to apply it in a strapless dress. These two blogs are so well done, that I am not going to try to reinvent the wheel and do my own how-to, but I will direct you to Sewaholic and Gertie's New Blog for Better Sewing for detailed instructions on preparing the boning and applying it to the bodice.


I did use Sewaholic's method of heating up the plastic boning in a pot on the stove to reduce the curl in the plastic. This worked great and made it much easier to insert the boning in the channels. I also used her suggestion to use a nail file to smooth out the ends after trimming them  to a curve.

Although I used the purchased boning channels, I really like the method that Gertie used for her dress. I can see where the purchase boning channels could be too bulky -- especially when you are dealing with fine fabrics like silk. I may do that in the final rendition of the dress.


These are the channels in the front of the dress under the bust. I had to guesstimate the length that they need to be. I cut the boning to 9 1/2 inches, sewed the bottom shut and then sewed them carefully on both sides of the channel to the inside of the front princess seam. In the picture on the left you can see that I have completed the application of one channel and have the second one pinned to death.

You may also notice that I have marked the channel
with the length of the boning. I figured that two or 3 months from now, when I fit the dress on DD, I won't remember the length and instead of having to re-measure it, I can just read it off the channel! Well, I have a few more channels to apply so I'll leave it at that.

I just checked on the dress form and it has shipped and is destined to arrive on Tuesday! Yea!

Happy Sewing!