Friday, January 17, 2014

The Wedding Dress 3.0


My last post was on December 1st and except for a lot of snow and a lot of very cold weather, not much of anything has happened. Nothing creative has happened for sure! I have not knitted, quilted or spun the only thing I have done is reworked the wedding dress a couple of times over. It is hard to work on miles and miles of plain white cotton. Last week I finished version three of the muslin and mailed it to DD via FedEx. Tonight she is going to try it on and we will do a fitting via Skype with one of her roommates helping. I am looking forward to starting the real dress if the fitting goes well.

I have to admit that I found a mistake in my calculations when I made the original bridal skirt. The pattern that I used for the skirt -- McCall's 6701 -- describes the dress as "close-fitting". The dress on the model in the picture is worn like a second skin. However, when I sat down and added up the width of all the pieces that made up the actual measurements of the dress at the waist -- it includes 2 1/2 inches of ease. So that is why my measurements were so far off! Note to self: Measure the pattern pieces themselves and measure them twice. . .

Now I just need to shake these winter "blues" that have set in with the winter white! Maybe I can get something done that has some color in it while I am waiting for the next stage in the dress.

Happy sewing, knitting, spinning or something! . . anything!

Sunday, December 1, 2013

The Wedding Dress -- The Fitting and Necessary Adjustments


The DD came up for Thanksgiving week and the second she arrived home from the airport, she wanted to try on the dress. Ouch -- the muslin was too big. It was probably a combination of her loosing a couple of inches and my cutting/sewing, but it was large all over. Because I had previously made so many adjustments.to the base bodice, I ended up making an entirely new one. I began by pinching up a small portion of the deference at each seam in order to spread out the adjustments evenly over all of the seams. Next I marked the changes onto new fabric and then re-cut all new pieces.

DD also wanted a few changes. The ruching in the drapes was too soft and not tight enough for her. So not only did I have to narrow the front and back drapes, I had to lengthen them to allow for more gathering from top to bottom.

It took me a while to figure out how to accomplish lengthening the pieces; but I ended up cutting the drape into 3 even slices and then pinning them on new fabric measuring from the salvages over to the grain line in each slice of the pattern piece. I smoothed out the seam lines with my fashion ruler and marked the new pieces.


On the left is the resulting elongated back drape and at the top of the page you can see the new and tighter looking ruching.

So, along with hosting Thanksgiving and having two of the "kids" home for the week, I have had to begin re-cutting the the muslin. We did have a fun morning a Vogue Fabric in Evanston, Illinois -- What a treat that was! Stay tuned for that story.

I have to admit, I have not been sleeping well the last few days. I lie awake trying to figure out what I need to do next; thinking about what else could go wrong; and wondering if I bit off more than I can chew.

Time will tell. Happy insomnia!


Saturday, November 2, 2013

The Wedding Dress -- The Flirt Skirt -- Changing the Pattern from Five Panels to Six


Back Panel of Simplicity 1760
Drew strait line past kick pleat
A few days ago, I posted that I had selected a pattern for DD's flirt skirt for the post wedding party. I explained that one of the things that I planned on doing was changing the back of the skirt from two panels to 3 panels making a total of 6 panels. This means that I will have 6 seams fairly evenly spread out around the hem of the skirt so that the box pleats (yes DD selected the box pleats) are also evenly disbursed.

Simplicity 1760 has a kick pleat and zipper along the center line. The zipper will be moved to the left side to match the zipper position of the bodice. By removing the kick pleat, I then had a straight line for the fold.

Marking the dart for cutting
There is also a dart in the center of each panel. I decided that the easiest way to divide the back, was to split it right though the dart. On the pattern piece, I drew a line parallel with the grain line from the point of the dart to the hemline. I then took my fashion ruler and drew in a curve from that point through the two top points of the dart. These lines are now my seam line.

I then pinned the piece to muslin and marked the back side panels with my tracing wheel and wax paper. When that piece was completely marked, I removed the pattern and marked another piece of muslin folded on the grain. This gives me three panels -- two sides and a center which was cut on the fold.

In the picture below you can see where the seam lines are marked. The 'X's are the center point of the former dart. I'll put the muslin together without the box pleat for the fitting. I don't want to do all the work for six box pleats just to find out that the skirt is 6 inches too long.

The marked former dart
I can finally see the light at the end of the tunnel as far as the muslin is concerned. My DD arrives for the Thanksgiving holiday and her fitting. We are also setting aside a day for a special trip to Vogue Fabrics to purchase the silk for her dress.

I have one last experiment left to see how big my circle ruffles need to be in order to get the perfect ruffle. One of my sewing friends suggested making the ruffles wider as they go down the skirt. Guess I will add that thought to the experiments.

Happy sewing!

Thursday, October 31, 2013

The Wedding Dress -- Godet vs Box Pleat

Faux box pleat (rt) and godet (rt)
Godet vs Box Pleat or should I say faux box pleat. We're talking flirt skirt here. I decided to experiment with a couple of options that may work for the reception flirt skirt. This skirt is in addition to the long wedding dress skirt with a train that I finished in my last post. What DD and I envision is a matching pencil flirt skirt which DD can change into during the reception so that dancing is easier. She can also take the separate bodice with the pencil skirt with her on the honeymoon to wear when night clubbing.

There are several ways to make the pencil skirt (Simplicity 1760) a flirt skirt. Any method that widens the skirt at the knees will make it a flirt skirt. I decided to experiment with the "godet" and a "faux box pleat". placed strategically around the hemline of a skirt, either option will allow movement of the skirt at the knees.

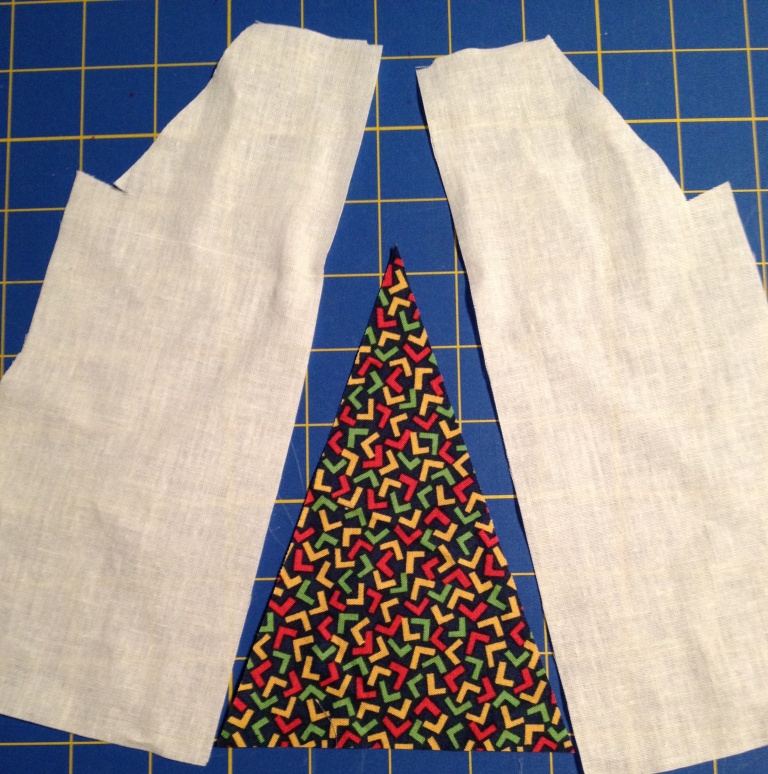
godet pieces
godet finished
A godet is a pie shaped slice of fabric. Here I used a triangular slice, but sometimes a godet has a rounded tip. I sewed the colored triangle to one "panel". Then sewed that entire "panel" to the other panel.

faux box pleat parts
Depending upon the type of fabric and the "hand" or feeling that it has, this slice of fabric may or may not be very visible.
 Of course with the fabrics being white and ivory, there will be little difference.

The faux box pleat is made using a colored rectangular or square piece of fabric between two panels of the skirt. The fabric is folded and as a result hides unless the wearer of the skirt is moving. Using a color of fabric similar to the main color of the skirt will make a very subtle look. While somewhat more complicated, imho, the box pleat gives 10 times the wow factor.

faux box pleat finished
Although it is totally up to DD (eh hem) I already know what option I that prefer. But of course DD will have final decision -- with a little help from her loving designer -- um er -- mom!

Happy flirting!

Sunday, October 27, 2013

The Wedding Dress -- Love Train


I got the muslin skirt for DD's wedding dress finished last night. Except for the fact that if felt like I cut miles of fabric, marked miles of seam lines, and sewed miles of panels together -- the skirt went together so easy! The skirt has 12 panel with lots of flair even after I adjusted it to reduce the parachute affect that the pattern has. After the bodice, it was a joy to assemble.

Going forward, I have been restricted to what I am allowed to show in the photos of the wedding dress. I am "Facebook friends" with the FSIL and DD does not want him to see photos of the whole dress. Since my blog automatically posts to my Facebook timeline I have to get all posts approved! But that is OK with me. At the end of July, I will likely make you tired of looking at pictures of her in the dress!

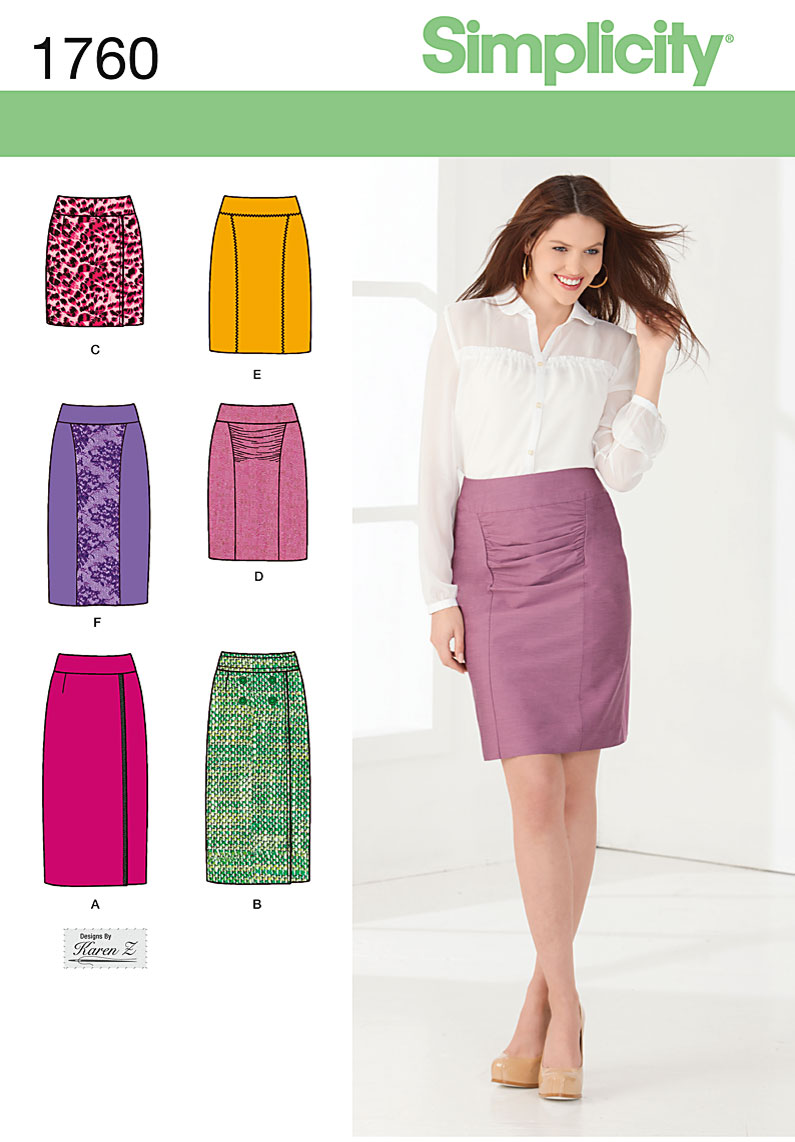
I finally purchased a skirt pattern for the pencil skirt. Simplicity 1760 view "D" is the choice. View D is the one the model is wearing. I am going to add flirt panels at the knee and extend the ruching a little lower than the pattern indicates. The ruching will mirror the bodice nicely and give interest to an otherwise plain skirt.

If you remember, the dress will be a mixture of white and ivory. The pencil skirt will be white with the flirt panels in ivory. The front of the dress has a modified princess seaming with three panels but the back is two paneled. I will likely change it to a 3 panel back so that there are a total of 6 panels and therefore 6 flirt panels. Changing the back to three panels won't be a problem as I intend to move the zipper to the left side to match the bodice anyway. It also eliminates the kick pleat at the back of the skirt. For some reasons I hate sewing kick pleats.

Well, DD arrives for Thanksgiving and her first fitting 4 weeks from today. I feel pretty good right now and with only the flirt skirt left, I'm ready for what ever the fitting brings.

Happy sewing!

Sunday, October 20, 2013

The Wedding Dress -- Bodice Finished - Lessons Learned


The muslin for the bodice is finally finished and I think this final version looks good. I learned a lot working on it and already have a list of things that I need to remember when making the real thing.

For the actual dress, I will get the finest and smoothest thread possible. Yes, I used colored thread on the muslin's seams, but even were I used light colored thread, you can still see the stitches. On fine silk, that will really show.

I need to take the time to measure the stop and start points of the draping on the side. As you can see on the photo to the left, the draping does not match on the side. It is off about 3/4 of an inch. Although some people may not have even noticed it -- having that in the finished product will drive me insane. (When DD's father walks her down the isle, there might as well be a neon sign with an arrow pointing to her side.)

You can really see that all of the untrimmed seams are poofing out the seam a bit. I also did not iron or steam the seams. There is no sense in doing that if I will be undoing them. Rest assured, the final version will be much smoother.

The unfinished side is where the zipper ends up. I am not going to add the zipper to the muslin - if I have to take it in or let it out at all during the fitting (and that is likely) I don't want to have to remove a zipper. I will have to pin it on DD along the seam line and fit it that way.

I like the back although it could have a little bit more ruching on the top side. In order to add more ruching, I will need to make the draping a couple inches taller form top to bottom. But I don't think that would be a problem. I will let DD make the call -- she is the one whose going to wear it after all.

By the way, I have cut out and sewn in all the seam lines on the skirt and will start constructing it this week.

Happy sewing!

Monday, October 7, 2013

The Wedding Dress -- On to the Skirt

McCall's 6701 is the base for the Hi-Low skirt that DD wants for her wedding dress, however, some adjustments need to be made. First, each panel is one piece from the top of the bodice to the bottom of the dress. I selected a line just above the pattern's waist which is one of the two points made for lengthening and shortening the dress. At this point I cut the bodice off of each piece. First adjustment accomplished.

Secondly, I needed to reduce the flair of the skirt to make it look more bridal and less parachute. I decided to make the adjustment using a hinge at the second lengthening/shorten point. Since I am not sure I can explain it with just words, I took pictures of the process with one of the smaller panels.

On the left you will see one of the panels of the skirt. I have circled the second lengthen/shorten mark.


Using a straight edge and my rotary cutter, I cut along this line.


I then folded the pattern, matching the line for the hem of a short version of the dress. After creasing the fold, I cut along that fold. I did not use the grain line as the cut. I wanted that left intact.


Here you can see all the pieces spread out.


Lifting one piece, I swung it over the other, overlapping the two pieces under the horizontal cut with a "hinge" at the top. When I go the pieces positioned just right, I taped up the overlap and taped the top piece back on making sure to line up the grain line. Then I redrew my hemline.

If my calculations are correct I removed about 2 feet out of the circumference of the dress at about the ankle. I think that this will reduce the flair enough, but if necessary, I can always make a similar hinge cut on the other side of the grain line.

Happy hinging!