Showing posts with label wedding. Show all posts

Sunday, August 3, 2014

The Wedding Dress - Requested Close Ups

Rhinestone Embellishments
Yes, you thought after my last post on The Wedding Dress would be the last one, right? Sorry! I was requested by a couple of people to show close up pictures of the "bling" that was on the dress. The picture above is of the large design that was on the side of DD's dress and also of the trim that went around the bodice and the bottom of the dress.

Placement of applique 
You can see that I placed the large design so that about two thirds of the design was on the front half of the dress and one third to the back. The braid was only on the top edge of the bodice and the bottom of the bridal skirt. We did not put the braid at the bottom edge of the bodice because it looked way too busy.

While the braid came from China, the head piece was purchased from the same vendor in Turkey who made the large applique. The veil was not attached to the head piece but attached to a separate comb. That way the veil could be removed for the reception as was the long skirt.

Headpiece


Happy embellishing!

Monday, July 21, 2014

The Wedding Dress - Worth Every Stitch

Unfortunately, iPhones do not take really good wedding photos and the photographer's photo's are not available yet, but I have waited long enough to share the pictures of "the dress".

from the fitting
It was a lot of fun to see "the dress" in action! It had just the right amount of bling! I really have nothing else to say. But here are several pictures taken at the wedding and also of the fitting a couple of months earlier. In the picture below of the fitting, I had not yet made the last and shortest of the three layers of the organza over-skirts. She wore only the two shortest layers of the over-skirts for the reception.

The short skirt worked out really well for the reception. She looked so cute and it was so much easier for her to enjoy the dancing.
from the fitting


Sunday, June 1, 2014

The Wedding Dress -- Whittling Away at the To Do List

organza wedding dress layers

I am working away at the to do list from my last post since DD left and went home to Florida. The third and final layer of the wedding dress is done. I think the effect is marvelous. In this picture, you can really see the French seams that I used in construction. When you see them over the white dress, they are much less noticeable. But French seams are a necessity when working with sheer fabrics that fray easily.

Creating the French seams is really time consuming, however, it is really worth the effort. If you don't know what a French seam is,  you may be familiar with a very similar seam found in blue jeans called a flat felled seam. It is a seam that requires three separate sewing lines which encase the raw edges of the fabric preventing them from fraying during normal wear and tear or washing.

In this seam, unlike regular sewing, you start with wrong sides together. After pinning the fabric wrong sides together, I ran a sewing line 1/4 inch from the edge of the fabric. With a cool iron I set the seam, then opened the seam so that the salvages fell to the same side and ironed again.


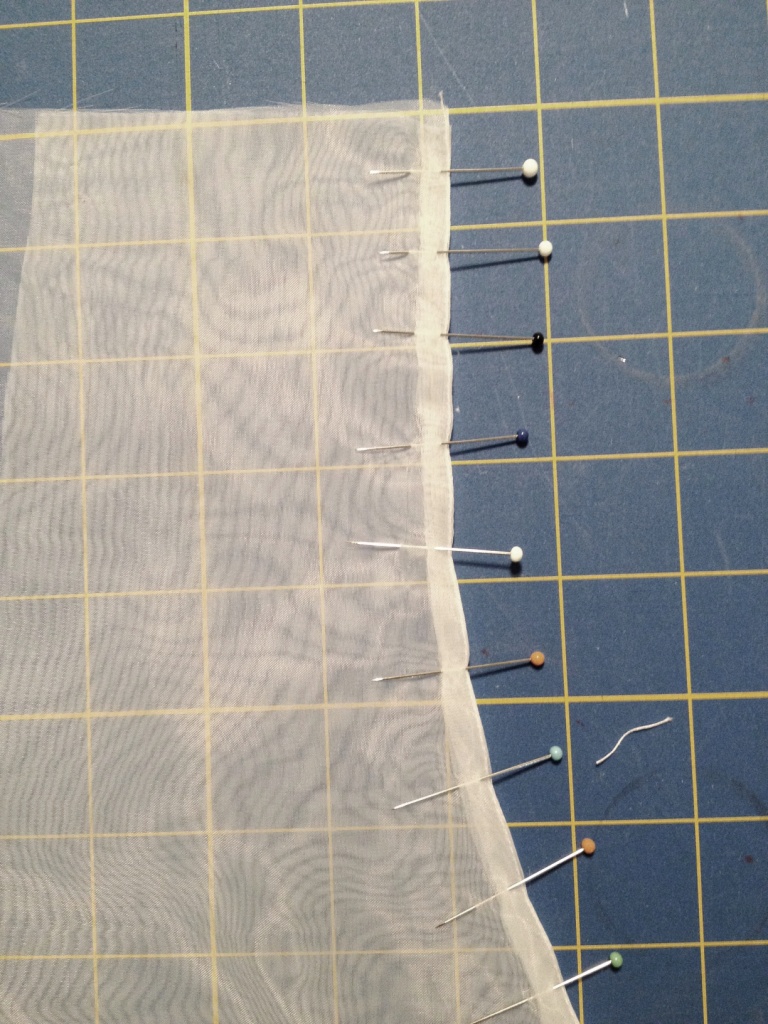
I turned the panels with right sides together and pinned the seam so that the raw edges were on the inside of the two panels.

I then ran a sewing line 3/8 inches from the edge of the fabric and again set the seam with a cool iron. You may think that these are narrow seams, and they are. However yo will find that 3/8 of an inch is not as "fine" as you may think. In addition, on a curved piece like this, if you make it any wider, you will have to snip the curve inside. For my purposes, with very shear fabric, I didn't want to see all the clipped fabric showing through.


Lastly, I pinned the seam down flat to the fabric, taking care to pull it flat in the curve. It is better to sew slow and carefully making sure to pull out the pins in advance. You want to pull the pins quite a bit before they come to the sewing foot of the machine for two reasons. Firstly, it gives you the ability to adjust the fabric in the curves of the seam--making sure nothing is wrinkled or folded. Secondly, if you hit a pin, disaster could strike.

On one of the times that I forgot to pull out a pin; the needle hit it and tore the organza. Luckily, it was at the very bottom of the panel that was trimmed off. If it had happened in the center of the skirt, I would have had to start over with those panels.


Here is the finished seam! Looks pretty good to me. Now that is a seam that will not fray and nor ever look messy.

Happy Sewing!

Saturday, May 17, 2014

The Wedding Dress - Final Fitting

Last week the DD came up for the week for the final fitting of the wedding dress. When she got here, the skirt was finished, the the bodice still unlined - without the hidden bra inserted or any of the 'bling' applied, the organza skirt only started and the birdcage veil was but an idea with the french netting not even purchased! However, we made great progress through the week and DD was extremely happy with the results!

DD enjoyed the whole fitting process, taking 'selfies' while I pinned the large rhinestone applique in place. She kept up a running conversation to keep me awake at the sewing machine late into the night. DD provided much needed quality control, "You aren't really going to do THAT? Are you?" and "Don't you think it would be cute if we did (fill in the blank) instead?!" and "Whatever you want, mom. . . "

There are still a few things to do:
- Finish the third and top layer of the organza over skirt.
- Cut out and assemble the short skirt for the reception.
- Add all of the hooks and eyes at the top of the zippers.
- Insert hanging loops on the skirt and bodice.
- Hem the lining of the bodice.
- Make a couple of adjustments to the rhinestone applique.
- Finish birdcage veil.
- And go over the whole dress looking for loose threads to snip.

With nine weeks left until the wedding, I feel like I am in a real good position to get everything done. However, I will be taking my sewing machine with me -- just in case.

Happy sewing!

Saturday, April 26, 2014

The Wedding Dress -- The Skirt is Finished!


After what seems like miles and miles of hand sewing, the skirt is done. I wish I could show you a more complete picture, but you know DD's rule! Can't give too much away. . .

On to the bodice and Happy Sewing!

Sunday, April 20, 2014

The Wedding Dress -- Sometimes Tack(y) is Good!

I got a lot of work done on the dress. I finished hand picking the skirt's zipper and sewed the skirt lining in at the top creating the plain skirt waist that DD wants.

At the present time, I have only basted the waist line, but I plan to set it with a couple of stitches in each seam and a good press.

I wanted to make sure that the lining does not shift around and get twisted up so I used a couture finishing technique called a French Tack or a Swing Tack. I found a lovely video that was made by my couture hero, Susan Khalji. It is a great lesson on how to do this technique properly.


Here is my tack! I think it looks great. I put one in every seam  -- some at the mid point and some closer to the hem.


I then pinned the trim around the hemline of the dress. That took forever! Now I am beginning to sew the trim on. When I am done with that I will finish sewing the lining to the hem and the skirt will be done.

Still so much work to be done.

Happy sewing.

Monday, April 14, 2014

The Wedding Dress - Bling from Turkey and a Horse Hair Hem


The bling finally arrived from Turkey. I was beginning to get worried but it still arrived before I am even ready for it. Again, this is just a small part of the actual design -- DD won't let me show the whole thing. Cannot spoil the groom's first glimpse!

This weekend I put the horse hair in the hem of the skirt. First, I pinned up the bottom where I wanted the hem, then I took out just a couple of pins at a time leaving just enough room to slip the horsehair into the hem.


I then heavily pinned the hem to keep the horse hair tight against the bottom of the hem.


After the entire hemline was completed, I basted in the horse hair and removed the pins.


That allowed me to trim back the edge of the hem to the top of the horse hair. I will use the same catch stitch that I used for the seams to finish the hem.

Of course, all of this work will soon be hidden behind the lining of the ivory dupioni. So much work, and no one will ever see it again!

Happy hemming!

Sunday, April 6, 2014

The Wedding Dress -- Quick Update with Photo


I just saw online that the applique has finally made it out of Istanbul and into a New Jersey US Postal Service Facility! Thankfully, it should be here sometime next week. The above trim made it all the way from China last week and is much prettier in person than in the photo above.

I should be done tacking all of the inside seams down on the dress soon. Then I can begin on putting in the lining and applying the sparkles! The last thing will be the fluffy over skirt.

Happy sewing!

Monday, February 17, 2014

The Wedding Dress -- Hand Basting the Layers


This thread is a dream! I am so glad I purchased it. The basting goes really fast and easy because the thread stays perfectly smooth like. . . well. . . silk! It doesn't kink, knot, or fray. I am certainly sold on using this thread for all basting needs.

Each pattern piece had to be set up so that it was easy to baste. I turned the pins 90 degrees so that when basting along the seam line, there was less chance to stab myself with a pin. No need to ruin a white wedding dress with a few drops of blood!


Each seam line had to be basted separately -- continuing the the sewing line without cutting the thread and re-knotting is a no-no. The point of basting is to hold two pieces of fabric together, temporarily and being able to remove it quickly as needed. Also, you want to remove only what you need to remove. If everything is connected, when you pull out one thread you may pull out too much.


I was able to complete three of the 12 bridal skirt pieces yesterday. I think I can get the rest of them done today. Because the basting is so easy to do, I've been entertaining myself by watching old television series on Hulu. Remember Emergency?

Happy basting (and saving lives)!