Monday, August 18, 2014

Julia Child - The Way to Cook


My DH is a book freak. If there is a book store in the area, he wants to stop in to look around. So this past weekend we were going past Half Price Books and the DH had to stop. This time however, I was the one to find a book to bring home: Julia Child's The Way to Cook. This, her seventh book, is a collection of over 800 recipes. I just had to have it.

So when I couldn't sleep last night, I picked up this huge door stop of a cook book and started to read recipes. I found one that was not only simple but the ingredients were cheap! So guess what we had for dinner?! Hominy Sautéed with Butter and Herbs on page 340. I only had dried herbs on hand so I guess in Julia Child's world, I must have cheated, but it was pretty good anyway!

I did find an online copy of the recipe here if you want to try it. If it is worth anything, my husband's comment was that he would eat it again -- and then he took seconds. I guess I will cook it again!

Now to find something else just a little different from what we usually eat. I think I saw a recipe for brussel sprouts in that book last night...

Happy cookbook reading!

Sunday, August 3, 2014

The Wedding Dress - Requested Close Ups

Rhinestone Embellishments
Yes, you thought after my last post on The Wedding Dress would be the last one, right? Sorry! I was requested by a couple of people to show close up pictures of the "bling" that was on the dress. The picture above is of the large design that was on the side of DD's dress and also of the trim that went around the bodice and the bottom of the dress.

Placement of applique 
You can see that I placed the large design so that about two thirds of the design was on the front half of the dress and one third to the back. The braid was only on the top edge of the bodice and the bottom of the bridal skirt. We did not put the braid at the bottom edge of the bodice because it looked way too busy.

While the braid came from China, the head piece was purchased from the same vendor in Turkey who made the large applique. The veil was not attached to the head piece but attached to a separate comb. That way the veil could be removed for the reception as was the long skirt.

Headpiece


Happy embellishing!

Saturday, August 2, 2014

An Unfinished Inheritance


Now, that the wedding dress is finished and the wedding is over, I am finally getting with long put off projects. This morning, I started cleaning out my basement and going through the overflowing bins of yarn and fabric. There are many unfinished projects in various stages ranging through knitting, crocheting, cross stitch, sewing and quilting. There is one quilt that I started over 30 years ago. It is embarrassing to see the "quitter" that I can be!

But, there are a few that I have been given - projects whose creator died and whose inheritor thought of me. I wish I could ask the creator what it was they were making, who they were making it for, etc. Take the project photographed up top. There were only a few granny squares and half of a skein of yarn in a bag. No instructions or notes. So, I dragged it upstairs to count the number of squares and see if anything could be made of them. Upon closer inspection, I found that there were actually squares which were obviously made by two different crocheters with two different yarns. There are 20 squares that were crocheted by one person and 14 crocheted by another. You can see the color difference in the picture at the top of the page. One yarn is slightly yellower and the other has a pink cast to it.


But that isn't the biggest difference.  One crocheter was very good and one. . . not so much. The granny square on the right is very, well,  square. However, the square on the left is not square at all. So what was the difference that made the left one lopsided and rounded? Stitch count.

The square on the right, like all of its sister squares, has even stitch counts on each of the four sides and the corners are consistent in the number of increases. Each side has three stitches in the first round, 7 stitches in the second round, 11 stitches in the 3rd round and 15 in the forth and final round.

The square on the left also has three stitches in the first round, but in the second round there is seven stitches on one side and six in each of the other 3 sides. The third round has 11 over the seven, then 10 stitches over the next side and 9 overt the last two sides. On the final round, there are 14, then 11, 12, and 13 stitches. This is one uneven square! It just goes to show how important counting your stitches can be.

There are enough good squares to make a nine patch pillow, so that is what I think that I will do.

Happy crocheting - er - counting stitches.

Sunday, July 27, 2014

Why Have I Become So Lazy That I Can't Write a Post That I Took Pictures for 3 Weeks Ago? A Modest Answer.


A couple of weeks ago, waaaaaaay before the wedding, my sister and I went shopping together for a dress for her to wear to my DD's wedding. She found "the perfect dress" almost. My sister doesn't want to wear a plunging neckline, and this dress had one, but we decided to fix that with a modesty panel. Also known as a chemisette, dickey, or mock camisole, it is easy to make and utilitarian. A modesty panel fills in the space that a plunging neckline does not hide.

You can buy modesty panels. I have a couple that I purchased. They look like the top edge of a camisole worn underneath a dress or top with a low neckline. But like many other things, I have never made one. But why not try one since I just made my first couture wedding dress with some success. So here is my DIY Modesty Panel.

We went to our local big box fabric store and picked up a black lace and a tan/beige/taupe colored fabric for the base. These were both colors in her dress. We looked for a lace fabric that had a nice finished edge. Not all lace has finished edges, so if you want to do something like this, look at the salvages to see if you like the edge.


The first thing that I did was fold over the edge of the taupe fabric to get a smooth straight edge. The wrinkled seam was taken care of by a warm iron. Next, I lined up the black lace so that it was even with the fold in the taupe fabric.


My sister was not interested in modeling for the next step (there is that modesty thing again), so we measured her bra from strap to strap while she had it on. But, so that you know what it is that I mean, here is a photo of that step while the bra is on a hanger. But remember to wear the bra when you are measuring it. The width will be different than a measurement on just a hanger!


Using the measurement of strap to strap, cut a piece of fabric that resembles the shape in the picture to the right. The top of the fabric should be the width of the strap to strap measurement and the length should be at least a couple of inches longer than the plunge in the "V" of the neckline.

I pinned both pieces of fabric together and used a grid ruler and rotary cutter to cut out the pieces.
Using thread that matched the lace, I tacked down the top edge of the lace to
the backing fabric. This made sure that they now acted as one piece of fabric. As you can see on the right, all I did was catch a few places -- most of the thread is on the backside.

I then pulled out my serger and went around all of the other edges to keep the two fabrics from separating.


While I had my serger out, I made two small strips about 3 inches long. One end was attached to the top of the modesty panel with a couple of stitches.  And the final step was to attach snaps so that it will be able to hang onto each bra strap.

I think it turned out well and my sister loved it. It was the perfect touch for the dress and worked well to achieve her desire for modesty.

Happy Sewing!

Monday, July 21, 2014

The Wedding Dress - Worth Every Stitch

Unfortunately, iPhones do not take really good wedding photos and the photographer's photo's are not available yet, but I have waited long enough to share the pictures of "the dress".

from the fitting
It was a lot of fun to see "the dress" in action! It had just the right amount of bling! I really have nothing else to say. But here are several pictures taken at the wedding and also of the fitting a couple of months earlier. In the picture below of the fitting, I had not yet made the last and shortest of the three layers of the organza over-skirts. She wore only the two shortest layers of the over-skirts for the reception.

The short skirt worked out really well for the reception. She looked so cute and it was so much easier for her to enjoy the dancing.
from the fitting


Sunday, June 1, 2014

The Wedding Dress -- Whittling Away at the To Do List

organza wedding dress layers

I am working away at the to do list from my last post since DD left and went home to Florida. The third and final layer of the wedding dress is done. I think the effect is marvelous. In this picture, you can really see the French seams that I used in construction. When you see them over the white dress, they are much less noticeable. But French seams are a necessity when working with sheer fabrics that fray easily.

Creating the French seams is really time consuming, however, it is really worth the effort. If you don't know what a French seam is,  you may be familiar with a very similar seam found in blue jeans called a flat felled seam. It is a seam that requires three separate sewing lines which encase the raw edges of the fabric preventing them from fraying during normal wear and tear or washing.

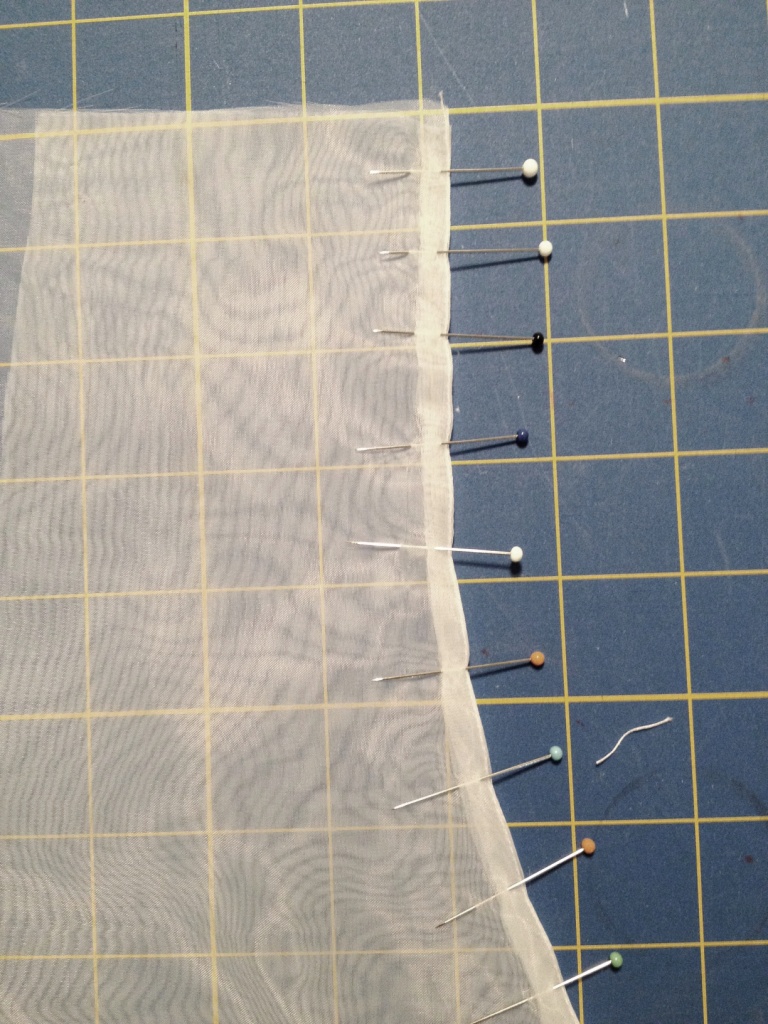
In this seam, unlike regular sewing, you start with wrong sides together. After pinning the fabric wrong sides together, I ran a sewing line 1/4 inch from the edge of the fabric. With a cool iron I set the seam, then opened the seam so that the salvages fell to the same side and ironed again.


I turned the panels with right sides together and pinned the seam so that the raw edges were on the inside of the two panels.

I then ran a sewing line 3/8 inches from the edge of the fabric and again set the seam with a cool iron. You may think that these are narrow seams, and they are. However yo will find that 3/8 of an inch is not as "fine" as you may think. In addition, on a curved piece like this, if you make it any wider, you will have to snip the curve inside. For my purposes, with very shear fabric, I didn't want to see all the clipped fabric showing through.


Lastly, I pinned the seam down flat to the fabric, taking care to pull it flat in the curve. It is better to sew slow and carefully making sure to pull out the pins in advance. You want to pull the pins quite a bit before they come to the sewing foot of the machine for two reasons. Firstly, it gives you the ability to adjust the fabric in the curves of the seam--making sure nothing is wrinkled or folded. Secondly, if you hit a pin, disaster could strike.

On one of the times that I forgot to pull out a pin; the needle hit it and tore the organza. Luckily, it was at the very bottom of the panel that was trimmed off. If it had happened in the center of the skirt, I would have had to start over with those panels.


Here is the finished seam! Looks pretty good to me. Now that is a seam that will not fray and nor ever look messy.

Happy Sewing!
Saturday, May 17, 2014

The Wedding Dress - Final Fitting

Last week the DD came up for the week for the final fitting of the wedding dress. When she got here, the skirt was finished, the the bodice still unlined - without the hidden bra inserted or any of the 'bling' applied, the organza skirt only started and the birdcage veil was but an idea with the french netting not even purchased! However, we made great progress through the week and DD was extremely happy with the results!

DD enjoyed the whole fitting process, taking 'selfies' while I pinned the large rhinestone applique in place. She kept up a running conversation to keep me awake at the sewing machine late into the night. DD provided much needed quality control, "You aren't really going to do THAT? Are you?" and "Don't you think it would be cute if we did (fill in the blank) instead?!" and "Whatever you want, mom. . . "

There are still a few things to do:
- Finish the third and top layer of the organza over skirt.
- Cut out and assemble the short skirt for the reception.
- Add all of the hooks and eyes at the top of the zippers.
- Insert hanging loops on the skirt and bodice.
- Hem the lining of the bodice.
- Make a couple of adjustments to the rhinestone applique.
- Finish birdcage veil.
- And go over the whole dress looking for loose threads to snip.

With nine weeks left until the wedding, I feel like I am in a real good position to get everything done. However, I will be taking my sewing machine with me -- just in case.

Happy sewing!