Showing posts with label pattern adjustments. Show all posts

Tuesday, September 3, 2013

The Wedding Dress - Preparing the Pattern for the Bodice


Since my work has instituted a new "use it or loose it" vacation policy, I am taking this whole week off for vacation. My eighty-nine year old father has come to stay with me for a few days and this morning we sat at my dining room table and while he read to me stories that he had written about his childhood, I began my DD's wedding gown.

This is View A of Butterick 5419 that I am using as the base for the bodice draping. It is a very plain strapless bodice with a sweetheart neckline. The fitted princess seamed top comes down to the hip-line and therefore needs to fit closely at bust, waist and hip. Conestoga wagons carried my ancestors from North Carolina to Indiana after the civil war.


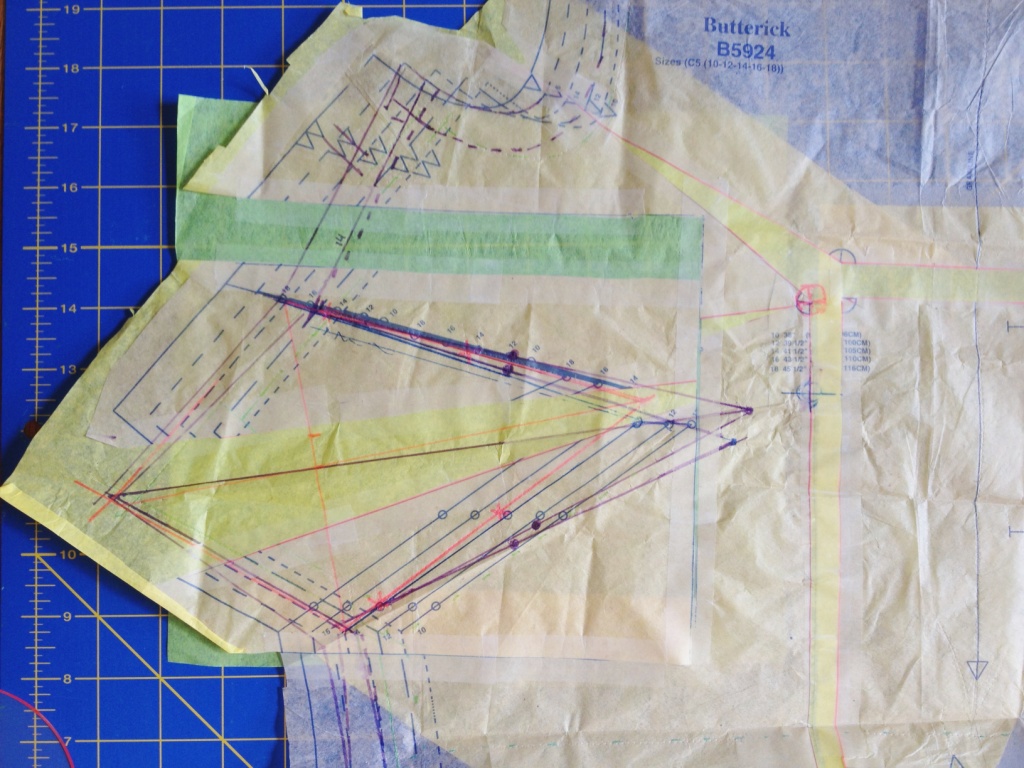
While my dad read the stories about his family that he wrote down over 2 decades ago, I separated the sheets of tissue paper to find pattern pieces numbered 1 through 4. My grandfather had been born by this time and was growing up with his grandparents as his mother died in childbirth. I cut the pattern pieces out and ironed them with a cool iron to get out all of the wrinkles. Next, I measured all of the pattern pieces to find out their dimensions. I compared DD's measurements to each piece and determined which ones would have to be adjusted and how.

By this time, my grandfather got his inheritance of land when his grandfather died and he sold it to his uncle and was able to take two years of college. I cut the pattern pieces à la my practice pattern for adjustments to the hips and bust. I know the waist will be too big, but I will take that in during the fitting.

World War I saw my grandfather in the army for only 10 months. He missed action over seas -- as an educated man, he was made a corporal and acted as secretary to an army general. I marked the pieces with the seam allowances so that I can mark the muslin next. You can see where I increased the width of the side back to adjust the hip to a larger size.

My grandfather was already a widower whose first wife died during the pandemic of the Spanish Flu. My grandmother was worked as a nurse and as a phone operator around the time that my grandfather met her. They were married by the Justice of the Peace. I'll get started marking the muslin tonight after dinner. I am hoping my father will continue to read to me as I work. It reminds me of when I was a little girl and we used to . . .

Happy story telling!

Saturday, August 24, 2013

Practice Pattern Continued -- Round 3

I am not a quitter, I am not a quitter, I am not a quitter!!! Or so I keep telling myself.

In our last episode on Butterick 5924, I made adjustments to increase the size of the bust line. I marked and cut the four new pieces of muslin for the pattern. Then I reassembled the blouse.

When I tried it on I still had fitting issues. I found that I must have incorrectly measured the length from the center nape of neck to the bust point. The bust point was too high and the dart points were really too pointy. The muslin was also a bit snug at the chest through the arm's eye.

I have gone back to the pattern and cut out a box around the dart. I slid the cut out about 1.25 inches lower and used green tissue paper to fill in the gap. I then lengthened the center line of the dart and redrew the dart legs. Lastly, I folded the pattern at the dart and redrew the side seam. Hopefully this will solve the dart problem.

I am also going to try to increase one pattern size up on the front side seams only. The back is plenty wide enough and I should be able to ease the sleeves in regardless of those changes. I have made so many changes to this pattern piece that if it needs any more changes, I may not be able to see my marks! Now to start the new muslin pieces.

Happy adjusting!

Saturday, August 3, 2013

Practice Pattern Continued -- Starting Over


For the last couple of days, I have been working on my practice blouse. I got all of the muslin pieces cut out and marked using the tracing wheel and waxed tracing paper as I told you in my last post.

Then, using my sewing machine and a dark colored thread, I sewed along the seam lines on each pattern piece to both stabilize the seams (especially on the lower bias pieces) and also give an unfading and tactile seam. This makes it pretty easy to pin the pieces together. You can literally use your fingers to slide the seams together and they "stick" when they are in the right place.

I then constructed the body pieces, less the sleeves and the collar. Pinning is
an important detail. It takes a lot of time to pin seams carefully. It is so much faster to throw in only a couple of pins -- or no pins at all -- and fly through the seams. But that is not the way of couture sewing. Couture is a slow, meditative process not a way to knock out an outfit on a Saturday afternoon. (Just today I read an article about how factory workers sew in ready-made clothing faster then home sewers. One reason was not using pins.)

figure 1
I was so excited as I went to try on the muslin for the first time. Ten seconds later I realized that the -- er, um -- "endowment" my mother gave me was going to mean going back to the drawing board. But that also meant that I could use the book that I reviewed last week!

I read up on how to adjust the bodice of a pattern for a larger bust. And then just followed the directions step by step. I drew my lines onto the pattern with a pink marker (figure 1), cut carefully and spread apart the cut pieces as the book described.

figure 2
You can see the yellow tissue paper from my gift wrapping stash that I used to fill in the gaps left by the cuts (figure 2). I used tape on both the front and back of the pattern piece to hold everything together so that I would not get any shifting.

figure 3
Since it was necessary to widen the top piece, I also had to widen the bottom front pattern piece. After lining up the top front and bottom front pieces, I marked the position of the cut onto the waistline of the bottom piece and took that line down to the hemline parallel to the center front line. I cut down the line and then slipped in another piece of the yellow tissue paper for fill in and taped it up matching the width of the gap in the top front (figure 3). The cut made the bias grain line jog, so I redrew it with the pink marker.

Next, I get to cut out the four pieces, mark them with the tracing wheel and paper, sew the seam lines in and reconstruct the body. Then we will see if my adjustments fixed the problem.

Happy sewing!