Showing posts with label how-to. Show all posts

Sunday, August 25, 2013

Applying Binding to a Quilt Part 1


In a couple of the last few blogs that I have done, I gave a how-to on making bias binding and cross grain binding. Regardless of which kind of binding you have made, you have to get it on the quilt.
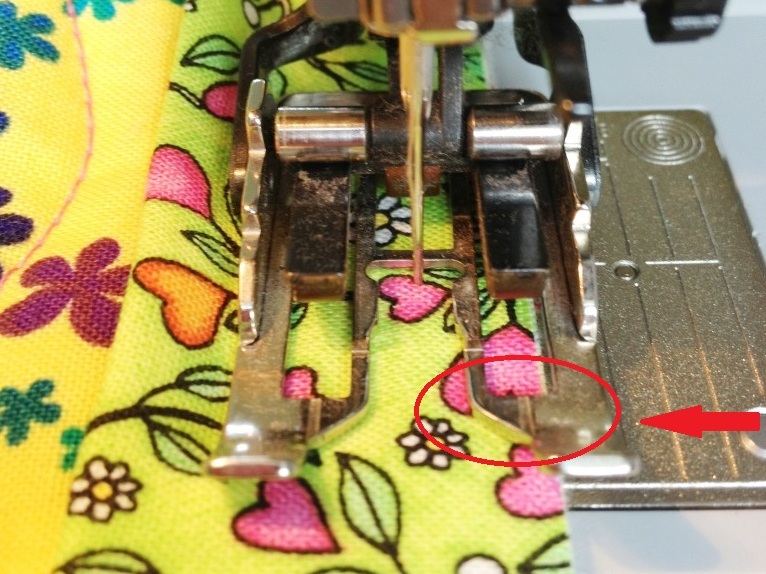
As I posted previously, I like making my binding 3/8 of an inch wide which means that I want to apply the binding with the raw edges together and seaming with just less than a 3/8 inch seam from the edge. I use the walking foot that I purchased with my machine and it has a 1/4 inch mark on the foot (the arrow/circle indicates the mark). You can see that my fabric is out just past that mark.

Now, having done yards and yards of binding over the years with this machine, I know just where to sew to get the width that I always use. You may have to practice a bit to get it just right. The type of batting and "hand" the fabric has also affects where you sew the binding, too. I know the few times that I have used a different fabric or batting, I have had to adjust either the position of the needle or where the raw edges line up in my machine.

Applying the binding is easy on the straight of way. Begin in the center of one side of the quilt. All you do is keep the fabric straight and let the machine do the work. The hard part for me is sewing the corners. I place a pin 3/8 inches before the end of
the fabric and sew until I hit this mark and backstitch a few stitches. This makes sure that the corner will be easier to hand sew later.

You have to remove the quilt from the machine at this point -- each side of the quilt is sewn separately. And the sides start and end at the corner.


To get a great sharp corner, don't rush through these steps. First fold the binding up creating a triangle and let the leading end of the binding flip back over the side you just completed.


Then fold the fabric back on itself.
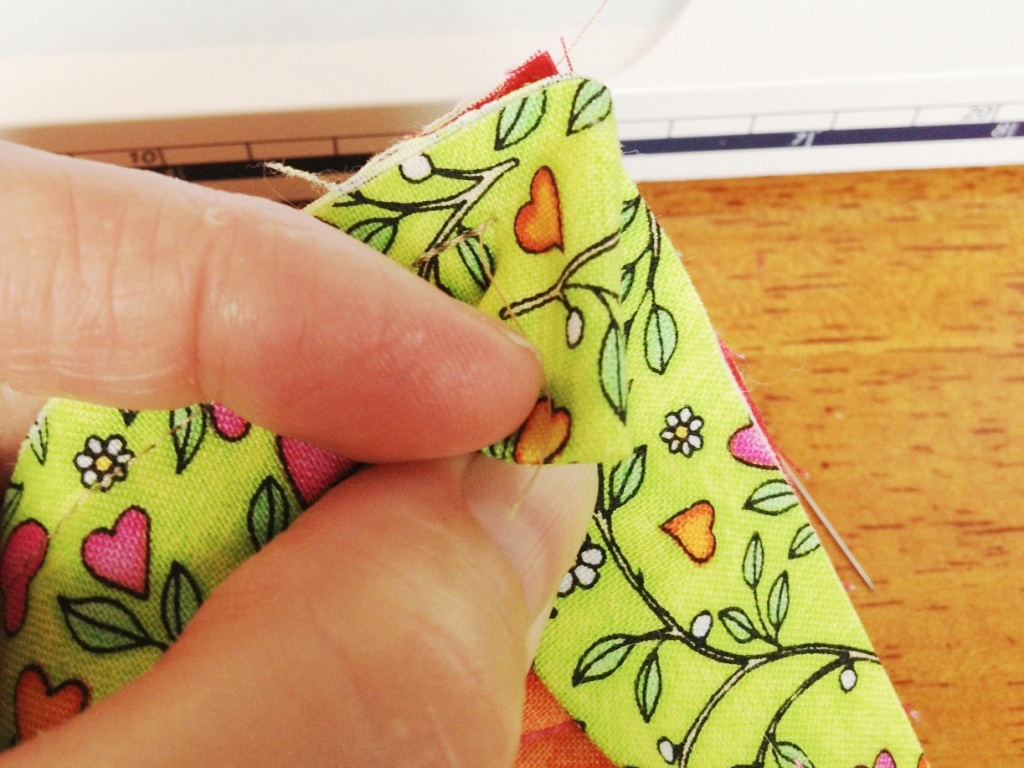


At this point there will be a small triangle of binding that will flip off the corner of the quilt.


Again, place a pin at the 3/8 inch from the raw edges at the top and begin sewing here. If you have been careful, you won't have sewn past the 3/8 inch mark and will get a really great corner.

Continue to sew all of the remaining sides and corners until you get back to the side that you started the binding. You will want to stop sewing about 8 to 10 inches before your starting point. And trim the binding off at a 45 degree angle about half way between the start and finish of the sewing.

Open both ends of the binding and overlap the just cut end over the beginning end. On the wrong side of the fabric use a pen to mark where the binding hits.


Make sure that the line is at a 45° angle -- you can see that I have lined up the edge of the binding with the 45° angle on my ruler -- and draw the line even darker. and all the way across.


Now thing carefully before this next step. You are going to line up your just marked line on the 1/2 inch line of your ruler. The end of the fabric will be where you are going to cut.


CAREFUL! If you are on the other side, you will cut your binding 1/2 inch too short. I tell you this from experience as I have had to add extra binding and redo the cut more times than I care to admit!!


Pin the two ends together so that the little "dog ears" are a 1/4 inch wide. Then sew the binding together with a quarter inch seam. You can finger press the seam to the side and stretch out the fabric and press it with an iron to get a nice crease.

Then sew up that last little opening.

Next up hand finishing!

Happy binding!


Sunday, August 4, 2013

How To Make Binding on the Bias

One of my favorite quilting things is binding a quilt with a stripe, a check or a plaid on the bias. It gives a quilt a wonderful diagonal look to the edging and a sense of movement. But creating a bias binding has a few tricks to it, so I thought I would share how I make it, pictorially.

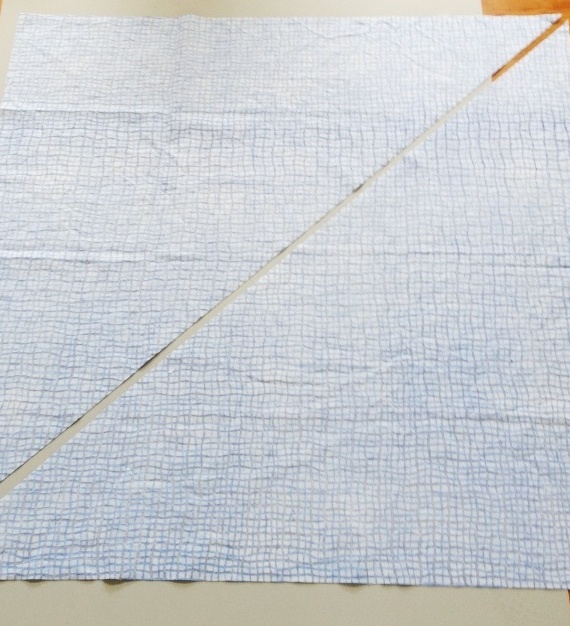
This a fun, wavy plaid in shades of blue that I am going to use on Flying in Formation.


The first step is to match the salvages and square the fabric. Use a clear ruler with a grid to line up the fold opposite the salvage and cut a 90° angle.


Then cut off one salvage edge. Be careful to cut evenly! You will be matching this edge with the last edge to get a 45° angle.


Fold the salvage up to meet the first cut you made. This will create a 45° angle in the fabric. At this point, ironing becomes very important! Iron the fabric using plenty of steam. Make sure you get a good crease.


Now taking the ruler again, cut off the fold that you created in the last step.


Spread out the fabric so that the diagonal cut in the center is side by side.

Take the piece of fabric on one side (here I have the taken the piece on the right and moved it across the left piece and match up the vertical / perpendicular sides.


Pin these two edges with right sides together.


Sew the line removing the pins as you go. Press the seam to one side. On the right side of the fabric, draw lines that are apart the width of the binding that you want. CAREFUL! Make sure that you draw the lines on the diagonal of the pattern -- diagonally to the seam you just made. If you draw the lines perpendicular with the seam then you will end up with regular binding, but went the long way around to get there!


 On one end of the lines, write the numbers beginning with "1". . .


and on the other end of the lines, write the numbers beginning with "2".


Then join the two sides to form a tube matching up the numbers.


Your "tube" will be off set by one number. If you start cutting here along the line, as you go around the tube you will find yourself cutting one long continuous line of binding.
Just keep cutting until you get to the end, or until you reach the skinny piece on the end.


Iron the binding in half length-wise and attach to the quilt.

Don't know how to attach it to a quilt? Stay tuned and Happy Binding!

Saturday, April 6, 2013

Good 'Old Fashioned' Cleaning


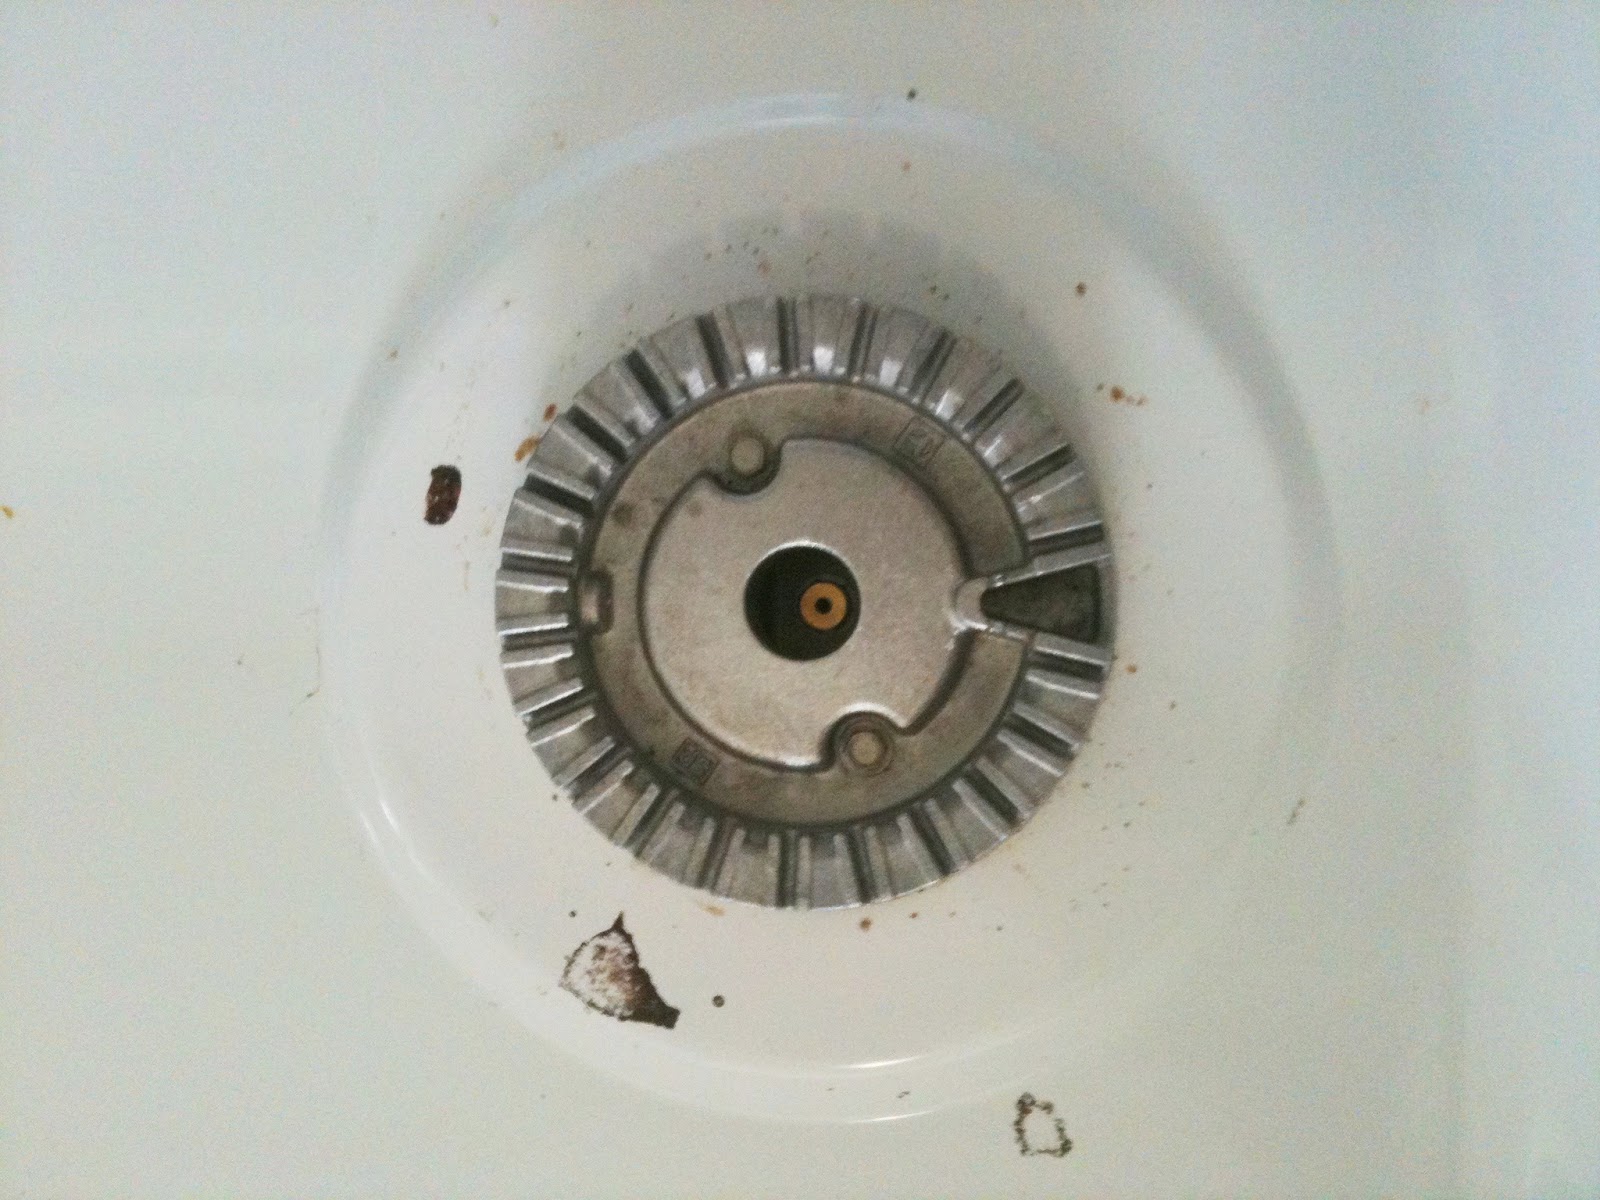
I tend to let a good cleaning go a little long sometimes. I will use my long daily commute as an excuse. Getting home to start dinner at 7:00 PM makes wiping down the stove at 8:00 PM the last thing I want to do. So, my 6 month old stove was beginning to look a little worse for wear. Mainly around the one burner that I use most--the front right one. (Did I just admit to the whole blogosphere that I'm a slob?)

Obviously, I didn't want to scrape off the burnt on grease and scratch the porcelain stove top, but a dishrag with plain soap and water just wasn't cutting it. So what do I do? Why google it of course! I came up with a lot of options in how-to articles and other people's blogs:


A lot of different suggestions, but all of them required a cash outlay and trip to the store except for two. I had
Goo Gone and the duo of baking soda and vinegar. Being the penny pincher that I can be, I decided to try the one of the two options that I had on hand.

First I tried the Goo Gone. Granted on Goo Gone's website they have a cleaner specifically for cleaning grills and ovens, but I only had the original formula. After cleaning the stove with soap and water to get the crumbs and loose splatters off, I sprayed the Goo Gone on to the baked on stains and let it sit for 3 - 5 minutes. After the wait, I used a paper towel to remove the Goo Gone and then used a plastic net scrubbie to scrub the the cook top. Hmmm. No change.

I wiped the area again to get any residue from the Goo Gone and got out the old fashioned baking soda and vinegar. According to a couple of the how-to articles that I read, I could just sprinkle on the baking soda and then spritz the vinegar on.

Using a small spoon, I sprinkled the baking soda around the burner taking care to cover all of the stains.


Next, I took another spoon and dribbled the vinegar into the baking soda. It immediately began to bubble up.


I let the baking soda and vinegar sit for 3 - 5 minutes and then wiped it off with a rag. WOW! "Old fashioned" nothing! There was only one little spot left.
Another round of baking soda and vinegar and a little elbow grease with the plastic net scrubbie again and the last of the baked on grease was gone.

Woo hoo! A clean stove and no trip to the store for expensive cleaners. So what other amazing things can baking soda and vinegar do? Here's what I found by googling again:

Clear a clogged drain - One cup of baking soda followed by 1 cup vinegar. Wait 10 minutes and pour in a cup of boiling water.

Cleaning stained carpet - Sprinkle on baking soda and spritz on vinegar. Let it foam up, scrub, allow to dry and vacuum. (You may want to test on an inconspicuous spot or spare piece of carpet to make sure it is color fast.)

De-lime and clean a shower head - Pour 1/2 cup baking soda and 1 cup vinegar in a large plastic bag and tie it on to the shower head. Leave in place for an hour.

As an air freshener - Mix 1 teaspoon baking soda, 4 teaspoons vinegar with 1 cup of water and spray with a fine mist sprayer.

Non-toxic, inexpensive and pet friendly, vinegar and baking soda can be a great alternative to expensive cleaners.


*I was unable to find the manufacturer of Sokoff. I found it for sale on several sites, but did not want to link to any one retailer.


Saturday, December 22, 2012

Sea Anemone Ear Flap Hat

Just the ear flaps done
After making Charlie's Chullo, I had tons of yarn left over. I bought three skeins of it, knowing that I was going to be cutting out all of the green and I only used 100 grams (equivalent of one skein). I thought of doing another Chullo for myself, but I decided I wanted to look for something different -- and something different I found!!!

I was reading some of the knitting blogs I follow and found this post by Carla Price on her blog Knitting is a Romantic Drama. BINGO! This was something different. I contacted Carla and she generously added her notes on how she created her self-designed hat. She pointed me to where she learned the stitch: a video by one of my favorite sock designers, Cat Bordhi (how did I miss that?!) And away I go. . .

I am still addicted to ear flaps, so I started directly  with the them -- no i-cord on this hat. Since the tendril is created on the knit row; I am doing my increases on the purl row. Although, both Carla and Cat made their tendrils with a set count of twists, I am being a little less rigid and twisting until it looks right as I am making them somewhat different lengths. (Anemones don't measure their little tentacles to make sure they are all exactly the same.)

I am thinking of adding a strap between the ear flaps to keep the hat tight in the Chicago winter wind. I don't want to loose this puppy! That is one nice thing that I found about the i-cord on the other hats (here and here) I made myself. If I tuck them into my coat, it helps the hat stay on in 50+ mph wind gusts. I walk across the Chicago River and the wind is always strongest there. I don't want any of my work to take a dive -- I won't go in after it.

This is a really fun project. I am taking detailed notes, so that if the hat works out, I will have a pattern to share. Who knows, maybe I will even go back and make a child size hat, too!

Happy Knitting!


How to make an tendril: 

Fig. 1
With right needle, pull yarn from back to front between 1st and 2nd stitch on left needle (Fig. 1), until you have a folded over piece of yarn about 3 to 4 inches long from fold back to knitting (Fig. 2).
Fig. 2


Fig. 3
Place your finger in the fold and twirl the yarn a few times as if you are plying it (Fig. 3).

Fig. 4
Fold it back on itself and place the loop from your finger to the left knitting needle (Fig. 4).


Fig. 5
Knit it along with the 1st stitch on the left needle (Fig. 5). One tendril made.

Fig. 6

Fig. 7
Be careful when knitting the tendril, that you keep the tendril under the needle as in Fig. 5. If you knit with the needle underneath the tendril (Fig.6), the tendril will end up on the wrong side of the fabric or the inside of the hat (Fig. 7).

Making the tendril the "wrong way" as in Fig. 6 is a little easier as the stitch is not stretched as tightly and I made several wrong and had to correct them.


Sunday, October 14, 2012

Short row knitting -- One of my favorite things!


As you may have seen in one of my most recent posts, I am currently knitting a skirt called the Carnaby. The skirt is knit with a pair of panels: one in a pattern and the other a stocking stitch wedge formed with short row knitting. I have grown quite fond of short rows. I remembered first learning how to do short row knitting when knitting sock heels. But I have found that short row knitting is used in all kinds of knitting.

Just like increases and decreases, short row knitting is a shaping method. Think "darts" in sewing. From the photo above, you can see the wedges formed with the short rows. (Ignore the color, my iPhone doesn't capture color indoors at night very well.) In the picture on the left, you can see where the short row stopped and turned around. The Carnaby pattern, spaces each short row end about 10 stitches  from the last one, with six short rows in all so that it is a long skinny wedge.

The Purl Bee has a very nice short row pictorial tutorial (wow that rhymes) showing the wrap and turn that most people use with short row knitting. "Purl" has pictures showing both the wrap and the pickup when both knitting and purling. And since Purl did such a great job, I would rather you check out her link. I'm not sure I would do half as well with my iPhone.

On Ravelry, as of the date of this post, if you do a pattern search on just the word short row you will have 12,518 patterns come up. Well that isn't all socks or skirts! There are coats, dresses, scarves, swimsuits, toys and buttons. Personally, I have made dog sweaters, socks, and an ear flap chullo on my knitting machine.

If you haven't tried short row knitting yet, you are missing out on a very useful skill. Pick up some yarn, pick out a pattern and get some learn'n on!

Happy Knitting!

Saturday, May 21, 2011

Making My Own Tools

As I said in an earlier post, I know that others have gone before me and that I am not reinventing the wheel. To that note, I took a page out of another Bond Ultimate Sweater Machine user's book. Clogden21's YouTube video shows several homemade tools that she has made. The one I wanted to try first was her weights made of fishing sinkers. Here is my version.

I went to the sporting goods department at Walmart and purchased some fishing sinkers. I wanted 2 oz weights but only found 1 oz weights left on the shelf.
They are cheap and I can work with those for the time being. If my experiment works, than I will get some 2 oz weights, too.

While clogden21 coated her weights in plastic, I decided to paint them. I chose a spray paint that was made for all types of products including metal and which came in a wide choice of colors. I think that was the hardest thing to do: choose the color. I wanted to go with a hot pink, but they were sold out of that color so I went with lavender.


The directions recommended that the spray painting be done where there was plenty of air and that the area be protected for over spray so I chose to do the painting in our garage. Even though it was the garage, I did protect the floor with paper bags so that the DH wouldn't wonder why the garage floor was lavender.

I sprayed the weights with 2 coats of paint letting them dry between coats according to the directions on the can of paint.

I also went to Jo-Ann Fabric & Craft Store and purchased some "pleater" curtain hooks. I like the length of the hooks and the fact that there are four "tines" that can distribute the weight over more than one stitch. Although with only one oz weights, there is not too much weight to distribute!

Using a pair of pliers, I flattened the bottom of the hook enough so that the weight would hang straight down. After sliding the weight onto the hook, I pinched the hook closed in order to prevent the weight from slipping off.

Okay, tools aren't supposed to be cute or pretty, but I think they are! And I can't wait to use them.

Happy Knitting!